To provide a comprehensive guide on creating dynamic, professional-looking certificates, ID cards, and other official documents. This document explains the core concepts of the template engine, provides a complete reference for all available data placeholders, and offers step-by-step instructions for creating and generating documents.
Part 1: Core Concept - How the Template Engine Works
The template engine is a powerful tool that allows you to design a document's layout once and then use it to automatically generate personalized versions for hundreds of students.
It works on a simple principle: Templates + Placeholders = Final Document.
- The Template: This is the base design of your document. You create it using a rich text editor, where you can add text, images (like logos or backgrounds), tables, and apply formatting (bold, italics, colors, alignment).
- The Placeholders: These are special codes that you insert into your template. Each placeholder is a direct link to a specific piece of data in the school's database. They are always enclosed in curly braces, like {student_name}.
- The Generation Process: When you choose to generate a document for a specific student, the engine does the following:
- It takes your saved template.
- It finds all the placeholders within it.
- For each placeholder, it fetches the corresponding data for the selected student from the database.
- It replaces the placeholder code with the actual data.
- The final, merged document is then presented to you in a print-ready format.
Example:
- Template Text: This is to certify that {student_name}...
- Selected Student: John Doe
- Final Document Text: This is to certify that John Doe...
Part 2: The Placeholder Reference Guide
This is a complete list of all the placeholders you can use when designing your templates. Using the exact syntax is crucial for them to work correctly.
| Placeholder Syntax | Description | Example Output |
| Student Details | ||
| {student_name} | The full name of the student. | John Doe |
| {first_name} | The first name of the student. | John |
| {last_name} | The last name of the student. | Doe |
| {admission_no} | The unique admission number. | SCH-0123 |
| {roll_no} | The roll number in their class. | 25 |
| {date_of_birth} | The student's date of birth. | 15-Mar-2010 |
| {gender} | The student's gender. | Male |
| {student_phone} | The student's personal phone number. | 9876543210 |
| {student_email} | The student's personal email address. | john.doe@email.com |
| {blood_group} | The student's blood group. | O+ |
| {religion} | The student's religion. | Hinduism |
| {caste} | The student's caste. | General |
| {student_photo} | Special: Inserts the student's photo. | (An image of the student) |
| Parent & Guardian Details | ||
| {father_name} | The father's full name. | Robert Doe |
| {father_phone} | The father's phone number. | 9988776655 |
| {father_occupation} | The father's occupation. | Engineer |
| {mother_name} | The mother's full name. | Maria Doe |
| {mother_phone} | The mother's phone number. | 9988776644 |
| {guardian_name} | The guardian's full name. | Robert Doe |
| {guardian_phone} | The guardian's phone number. | 9988776655 |
| Address Details | ||
| {current_address} | The student's current mailing address. | 123 Park Avenue, New York |
| {permanent_address} | The student's permanent address. | 456 Main Street, New York |
| Academic Details | ||
| {class_name} | The name of the student's current class. | Class 10 |
| {section_name} | The name of the student's current section. | A |
| School Details | ||
| {school_name} | The full name of your school. | Apex International School |
| {school_address} | The address of your school. | Smriti Nagar, Bhilai |
| {school_phone} | The main phone number of your school. | +91 6263056401 |
| {school_logo} | Special: Inserts the school's logo. | (Your school's logo image) |
| {principal_signature} | Special: Inserts the principal's signature. | (The signature image) |
| Dynamic Placeholders | ||
| {current_date} | The date when the document is generated. | 23-Sep-2025 |
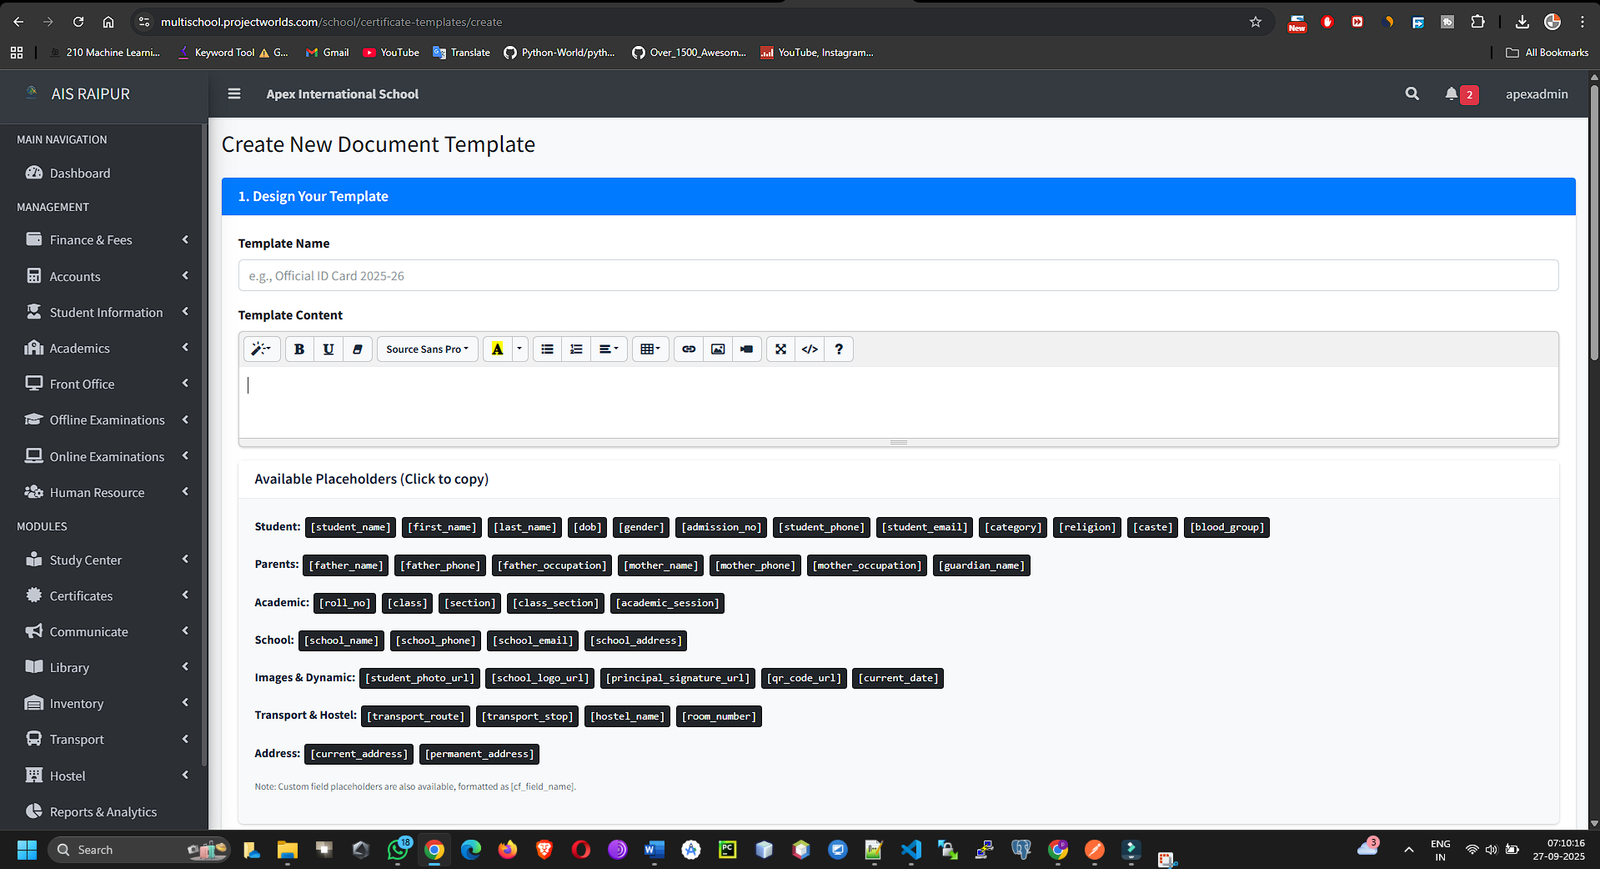
Part 3: Step-by-Step Guide to Creating a Template
Navigation: MODULES > Certificates > Certificate Templates
- Click + Add New Template.
- Enter Template Name: Give your template a clear, internal name (e.g., "Student ID Card Landscape", "Bonafide Certificate 2025").
- Use the Content Editor: This is your design canvas.
- For a simple text certificate (Bonafide):
- Type the static text directly.
- Where dynamic data is needed, copy and paste the exact placeholder from the reference guide above.
- For a simple text certificate (Bonafide):
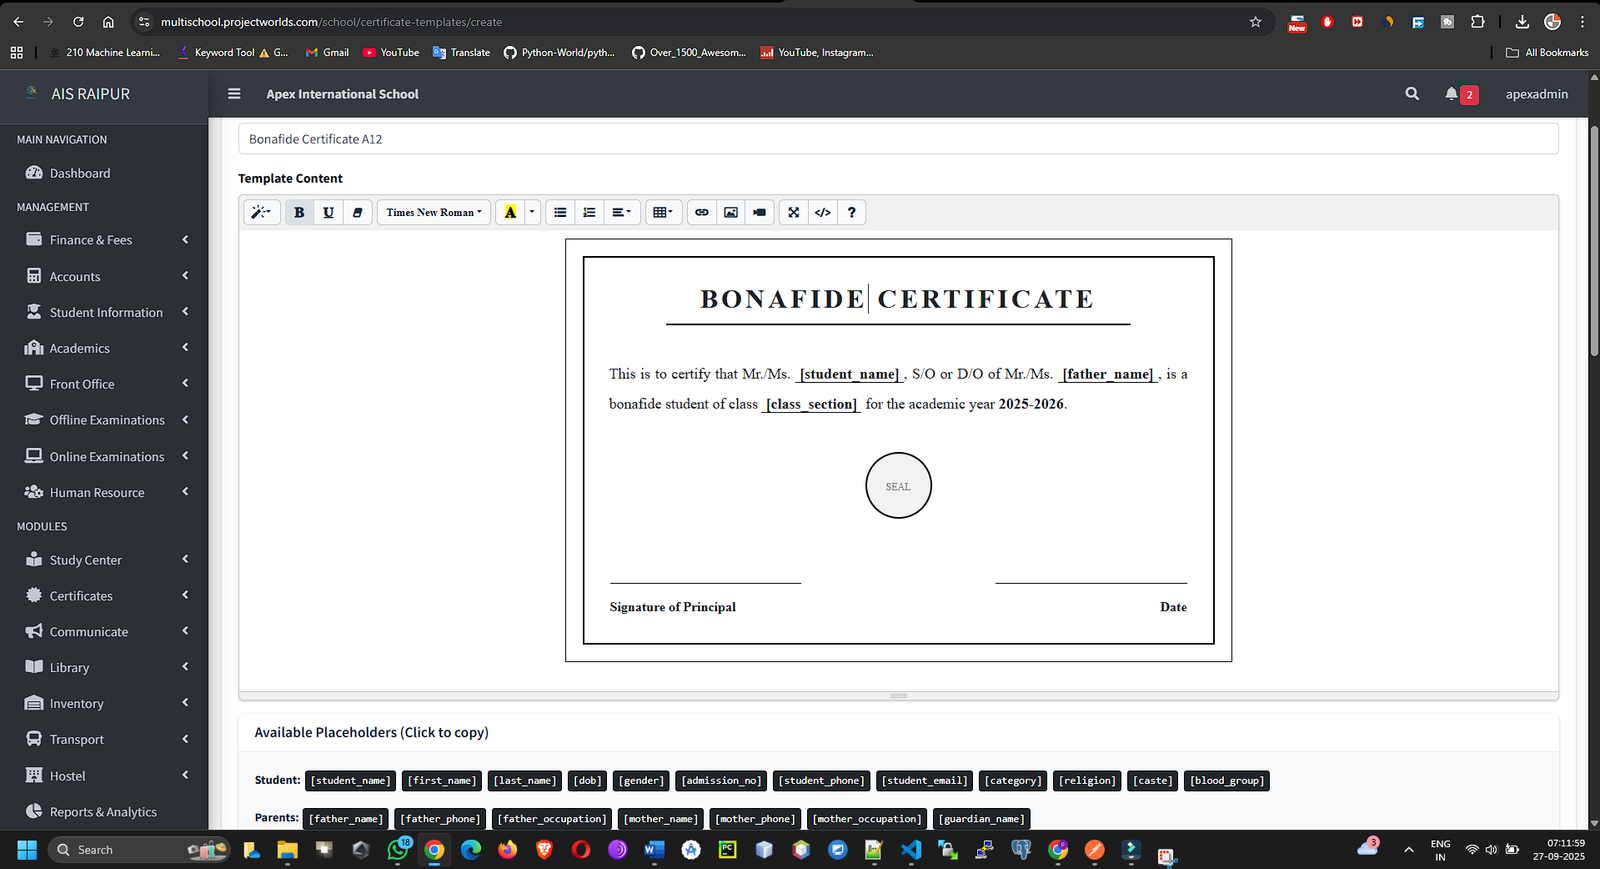
Example Text for a Bonafide Certificate:
codeHtml
<center><h2><u>BONAFIDE CERTIFICATE</u></h2></center>
<p> </p>
<p>This is to certify that <b>{student_name}</b>, Admission Number <b>{admission_no}</b>, is a bonafide student of our school. </p>
<p>According to our school records, their date of birth is <b>{date_of_birth}</b> and they are currently studying in <b>{class_name} - {section_name}</b>.</p>
<p>We wish them all the best.</p>
<p> </p>
<p>Date: {current_date}</p>
<p>{principal_signature}</p>
<p><b>Principal</b><br>{school_name}</p>
Part 4: Advanced Templating Techniques
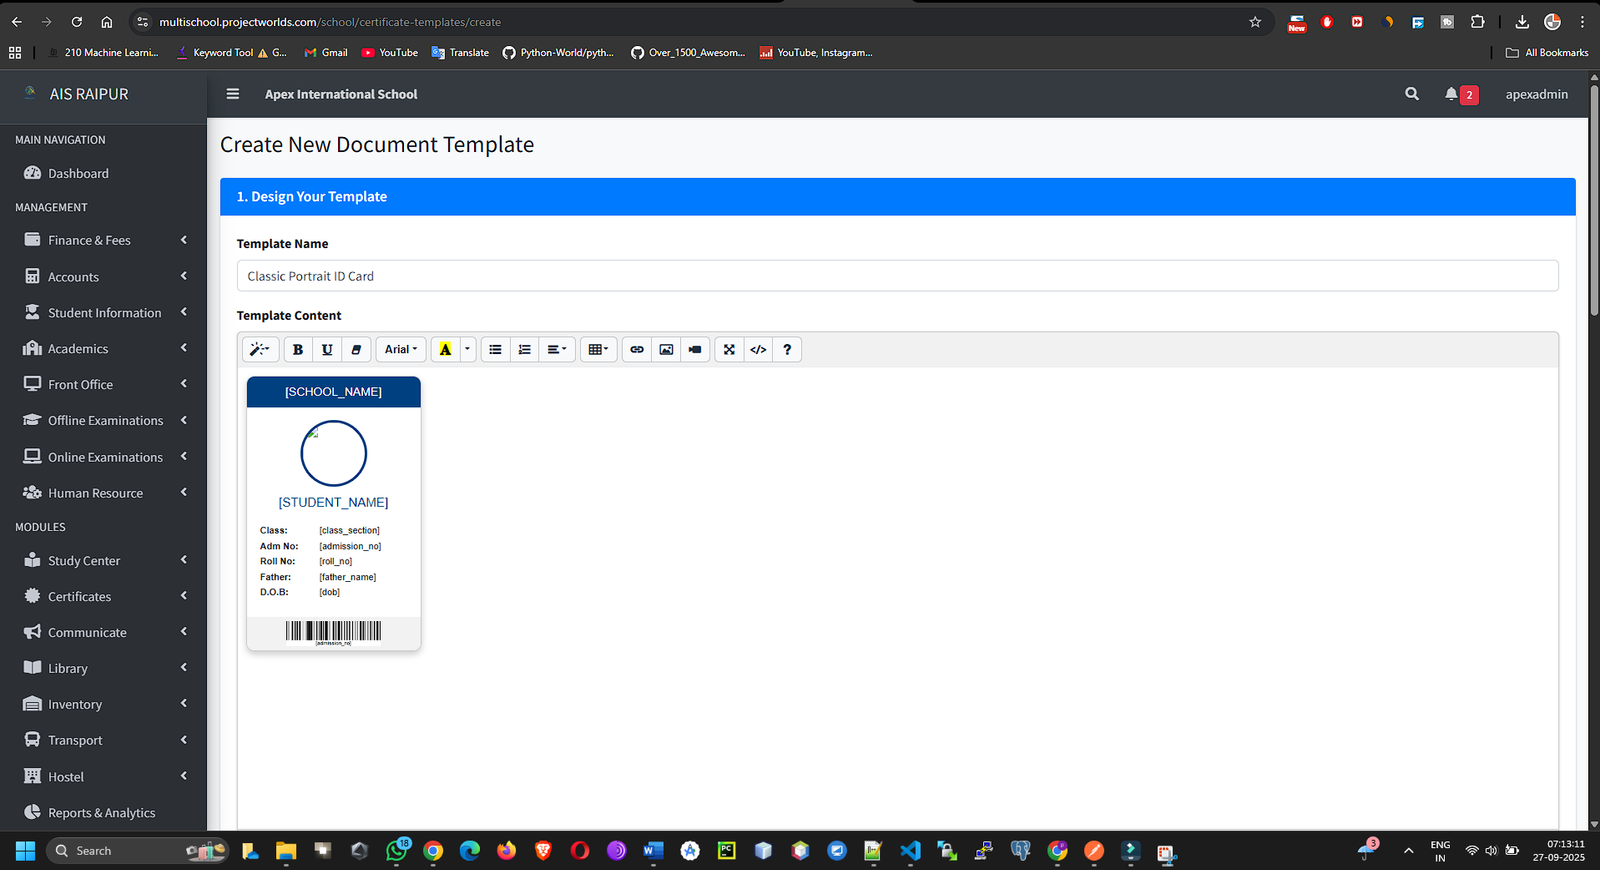
Creating a Student ID Card using Tables
Tables are the best way to structure an ID card.
- In the content editor, insert a table (e.g., 2 columns, 5 rows).
- In the left column, place the static labels (e.g., "Name:", "Class:", "DOB:").
- In the right column, place the corresponding placeholders.
- For the photo, you can have a dedicated cell or row.
Example Table Structure:
codeHtml
<table style="width:100%; border: 1px solid black;">
<tr>
<td rowspan="4">{student_photo}</td>
<td><b>Name:</b></td>
<td>{student_name}</td>
</tr>
<tr>
<td><b>Class:</b></td>
<td>{class_name} - {section_name}</td>
</tr>
<tr>
<td><b>Adm No:</b></td>
<td>{admission_no}</td>
</tr>
<tr>
<td><b>Contact:</b></td>
<td>{father_phone}</td>
</tr>
</table>
Using Background Images
Many certificates have a decorative border or a watermark.
- Find the "Source Code" or <> button in the rich text editor's toolbar.
- Wrap your entire template content in a <div> tag with a style attribute for the background image.
- You must host your background image online and get its public URL.
- Example code:
codeHtml
<div style="background-image: url('https://example.com/path/to/your/border.png'); background-size: cover; padding: 20px;">
<!-- All your certificate content, text, tables, etc., goes here -->
</div>
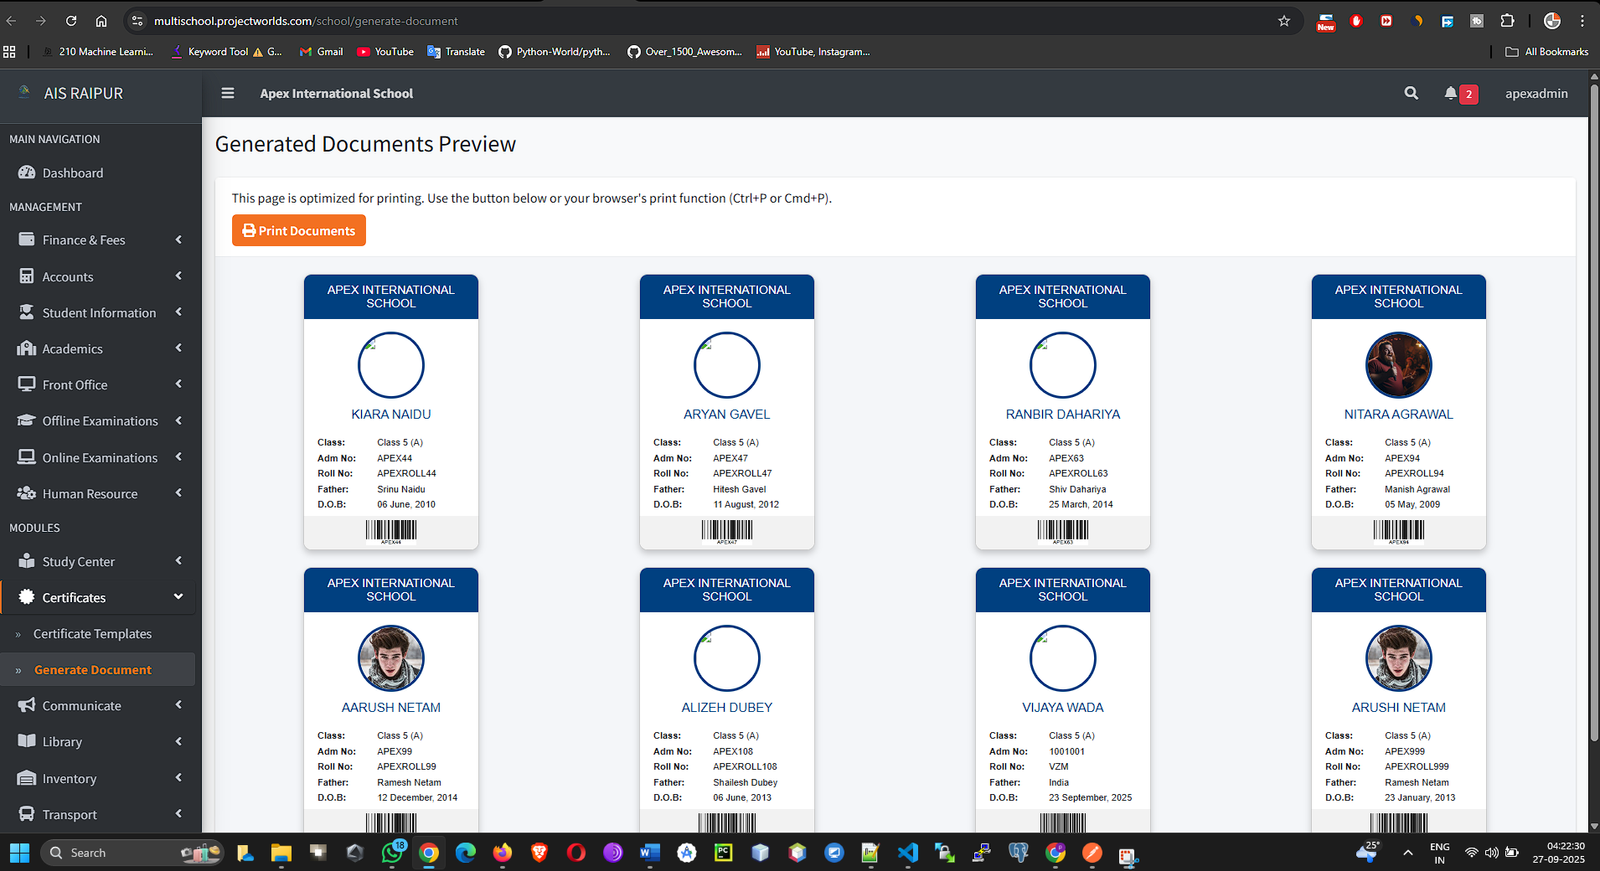
Part 5: Generating the Final Documents
Once your template is saved, you can use it to generate documents.
Navigation: MODULES > Certificates > Generate Document
- Select Certificate Template: Choose the design you want to use from the dropdown.
- Select Class & Section: Choose the group of students for whom you want to generate the documents.
- Click Search.
- A list of all students will appear.
- Click the Generate (Print) icon next to an individual student to create a single document.
- Or, select multiple students using the checkboxes and use the "Generate for Selected" button to create documents in bulk, ready for printing.
- A print preview will open with the final, data-filled documents.