To set up a structured fee system, assign fees to students, collect payments (both offline and online), manage discounts, and track all financial transactions within the school.
3.1 Fees Setup: The Foundation
Before you can collect any fees, you must define what you are collecting. This is a three-step process.
Navigation: MANAGEMENT > Finance & Fees > Fees Setup
Step A: Create Fee Types
Fee Types are the individual components of your fee structure.
- From the Fees Setup menu, select Fee Types.
- Click the + Add New Fee Type button.
- A modal will appear. Fill in the details:
- Fee Type Name: The name of the fee component. Examples: "Tuition Fee", "Bus Fee", "Library Fee", "Annual Charges".
- Fee Code (Optional): A shortcode for reference. Example: "TF", "BF".
- Description (Optional): A brief note about the fee type.
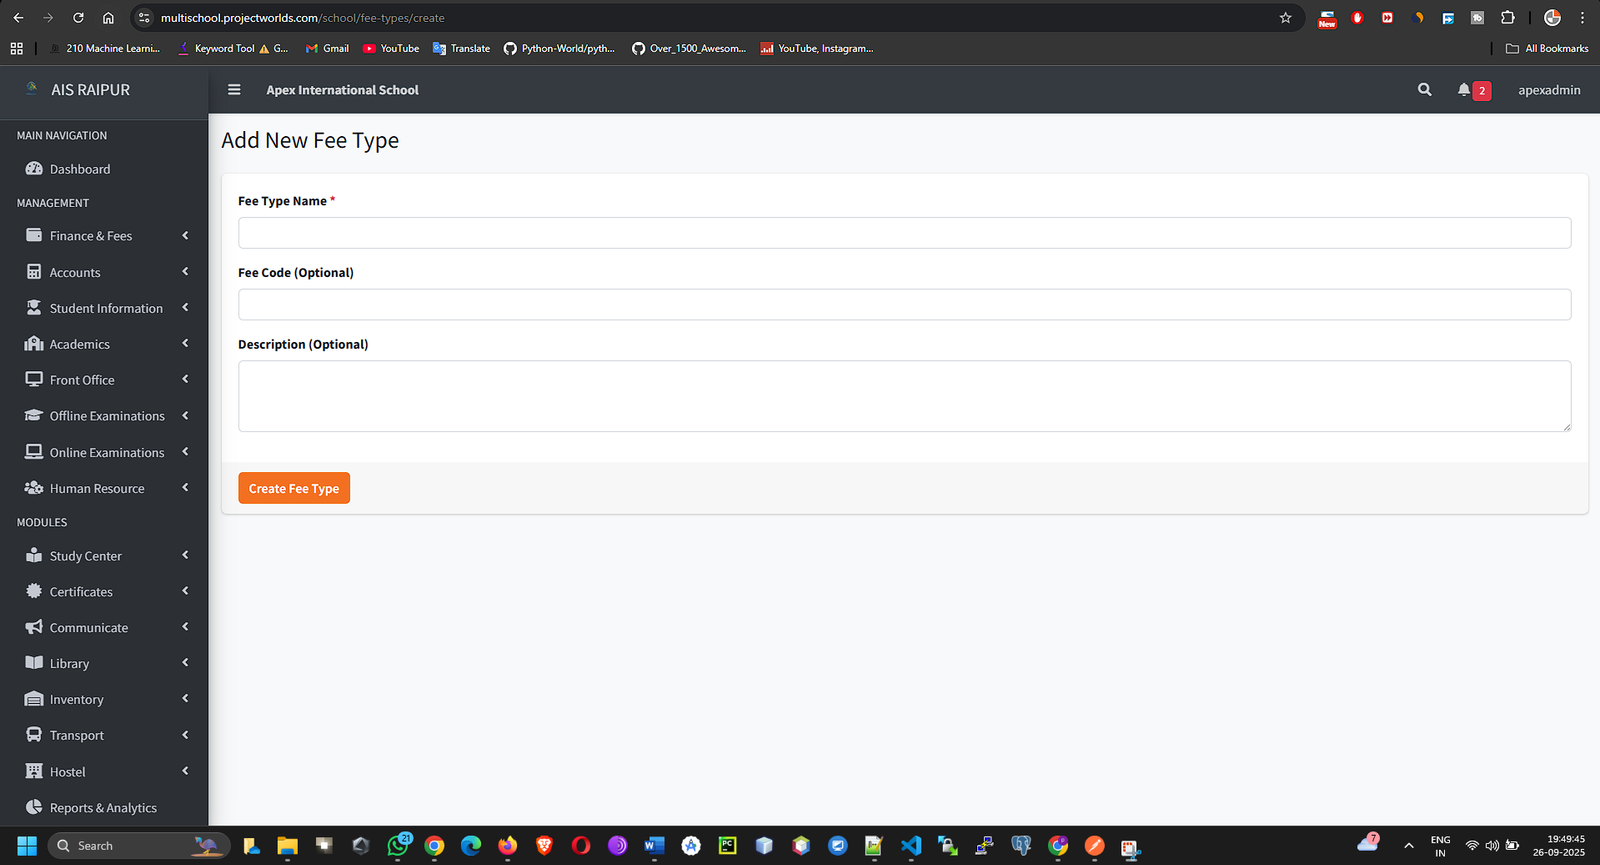
- Click Save. Repeat this for every single fee component your school charges.
Step B: Create Fee Groups
Fee Groups bundle multiple Fee Types together for easy assignment. A student is assigned a "Group," not individual types.
- From the Fees Setup menu, select Fee Groups.
- Click the + Add New Fee Group button.
- On the "Add Fee Group" page, enter the Group Name. This should be descriptive. Examples: "Class 10 - Term 1 Fees", "Nursery Monthly Fees".
[SCREENSHOT: Fees_Setup_AddFeeGroup_Name.png]
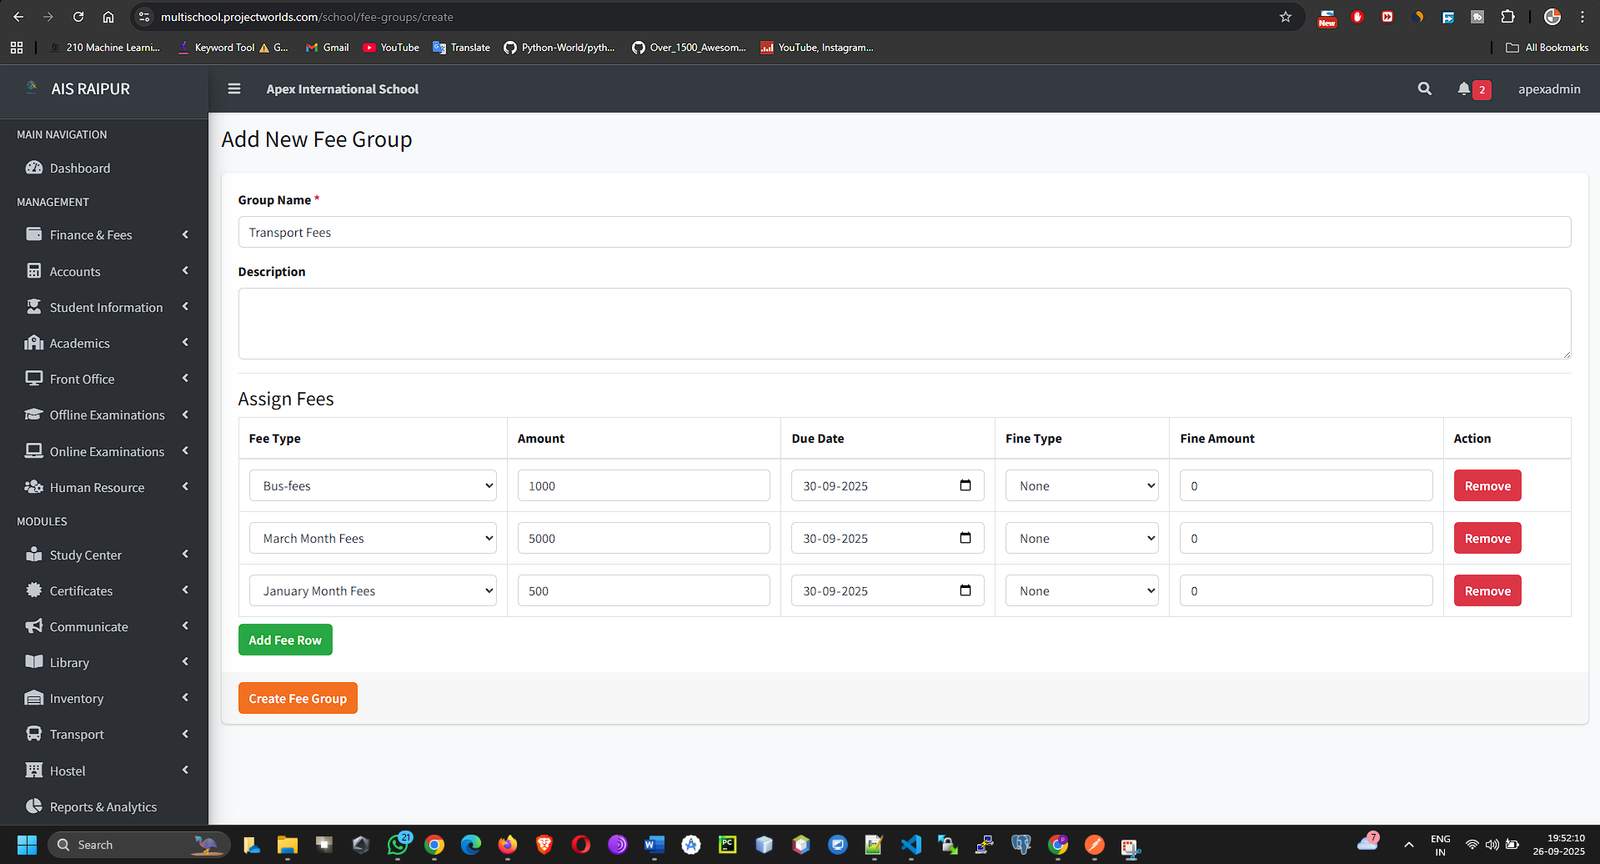
- Now, you will build the group. In the table below, click the + Add Row button.
- For each row you add:
- Select Fee Type: Choose a fee type you created in Step A from the dropdown.
- Amount: Enter the amount for this specific fee type.
- Due Date: Select the last date for payment for this fee item.
- Fine Type & Amount (Optional): You can set a late fee fine. Choose a Fine Type (None, Fixed, Percentage) and enter the Fine Amount.
- Continue adding rows until the group contains all the necessary fee types.
- Click Save Fee Group.
Step C: Create Fee Discounts
Discounts are predefined reductions that can be applied during fee collection.
- From the Fees Setup menu, select Fees Discount.
- Click the + Add New Discount button.
- Fill in the discount details:
- Discount Name: A descriptive name. Examples: "Sibling Discount", "Merit Scholarship", "Staff Ward Concession".
- Discount Code: A unique code for this discount.
- Discount Type: Choose Fixed Amount or Percentage.
- Amount / Percentage: Enter the value of the discount.

- Click Save.
3.2 Assigning Fees to Students
Now that your fee structure is defined, you can generate fee invoices for students.
Navigation: MANAGEMENT > Finance & Fees > Fees Management > Assign Fees
- On the "Assign Fees" page, you will see a search panel.
- Select Fee Group: Choose the fee group you want to assign (e.g., "Class 10 - Term 1 Fees").
- Select Class and Select Section.
- Click the Search button.
- A list of all students in the selected class/section will appear.
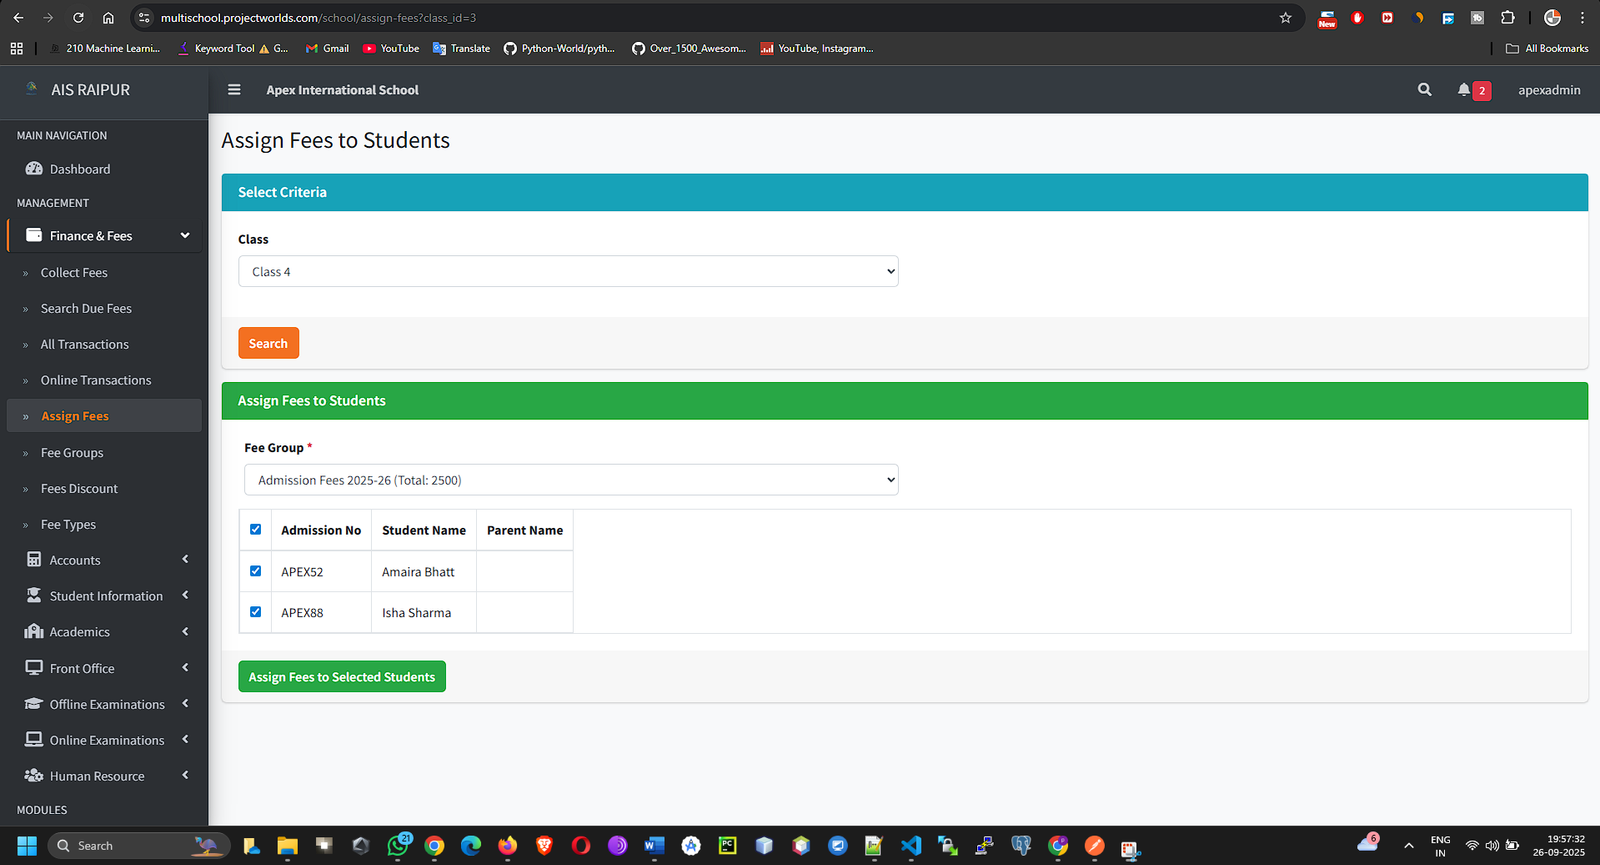
- You can assign the fee group in two ways:
- Bulk Assign: Check the box in the table header to select all students.
- Individual Assign: Check the box next to the specific students you want to assign the fee to.
- Click the Assign Fees button. The system will now generate a unique fee master record for each selected student based on the chosen fee group.
3.3 Fee Collection & Payment Management
This is the core operational part of the module.
Collecting Fees (Offline Payments)
Navigation: MANAGEMENT > Finance & Fees > Fees Management > Collect Fees
- This page acts like a cashier's counter. Use the search bar to find a student by Admission No, Roll No, or Name.
- When you select a student, the page will load their complete fee summary, showing Total Fees, Paid, and Balance.
- Below the summary, you will see a list of all fee invoices (groups) assigned to them, with statuses like Unpaid, Partial, or Paid.
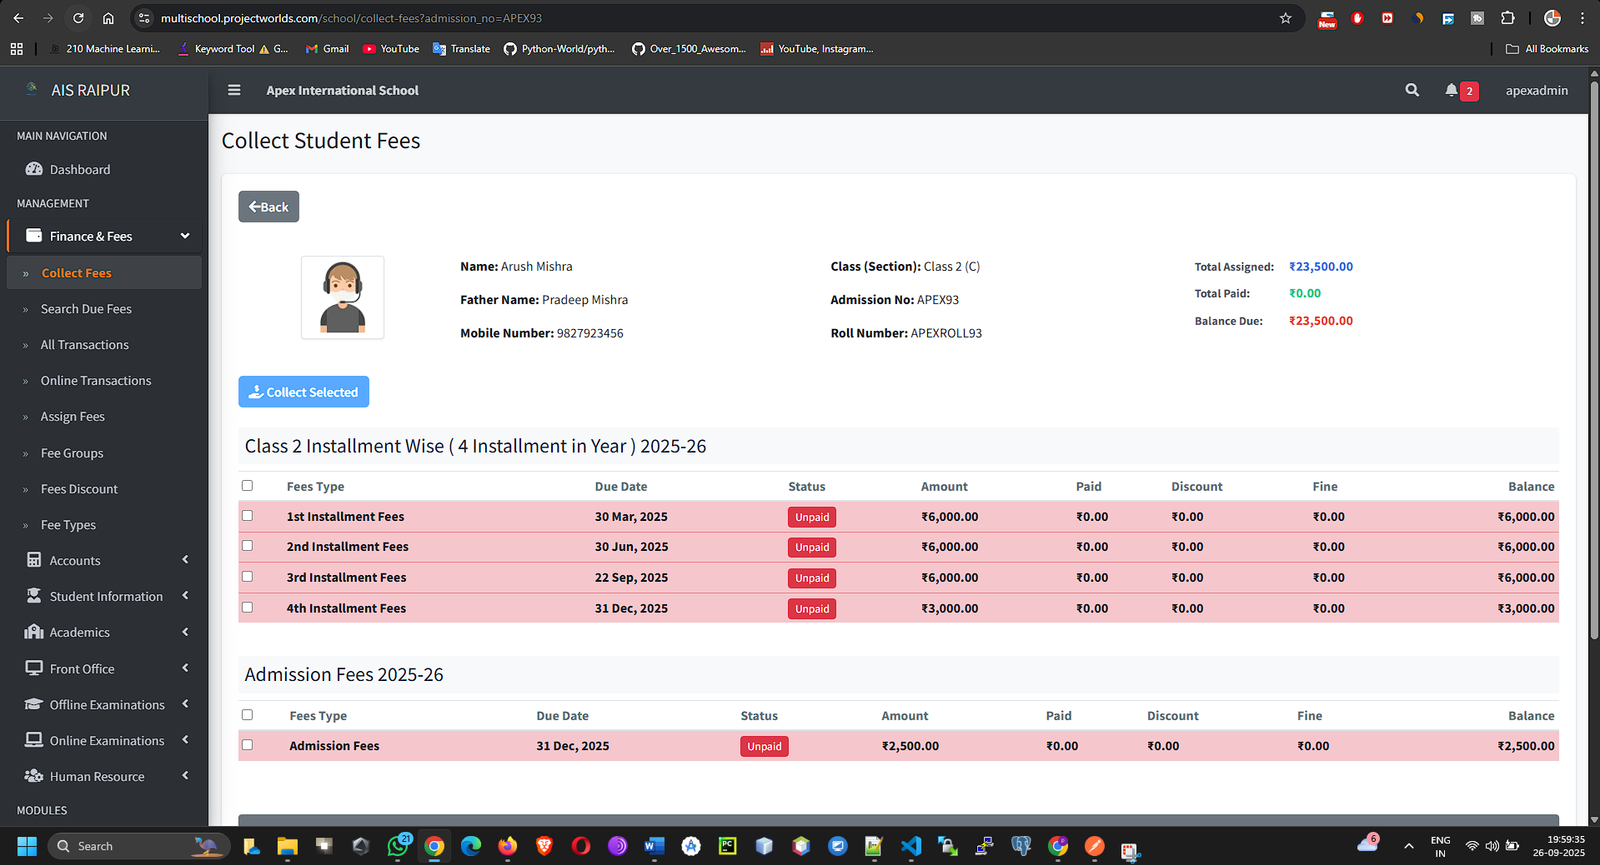
- Find an Unpaid or Partial invoice and click the Collect Fee button in the "Action" column.
- A payment modal will appear:
- It will list all the individual fee items within that invoice.
- Payment Date: Defaults to the current date.
- Amount: The amount the parent is paying now.
- Payment Mode: Select from Cash, Cheque, Online, etc.
- Receipt No: A unique receipt number is automatically generated.
- Add Notes (Optional): Any remarks about the payment.
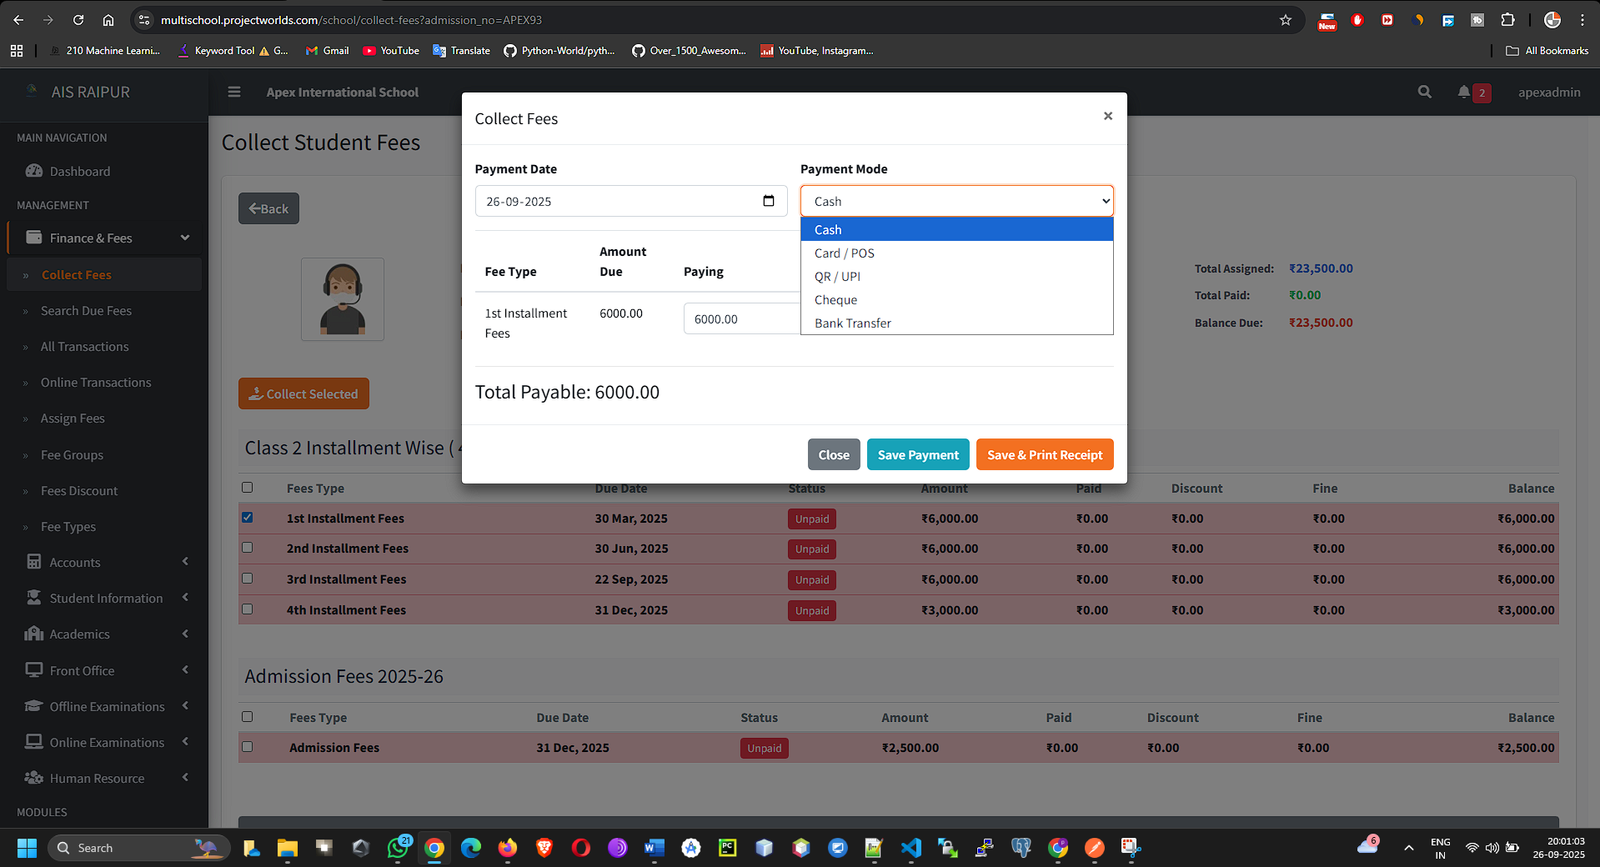
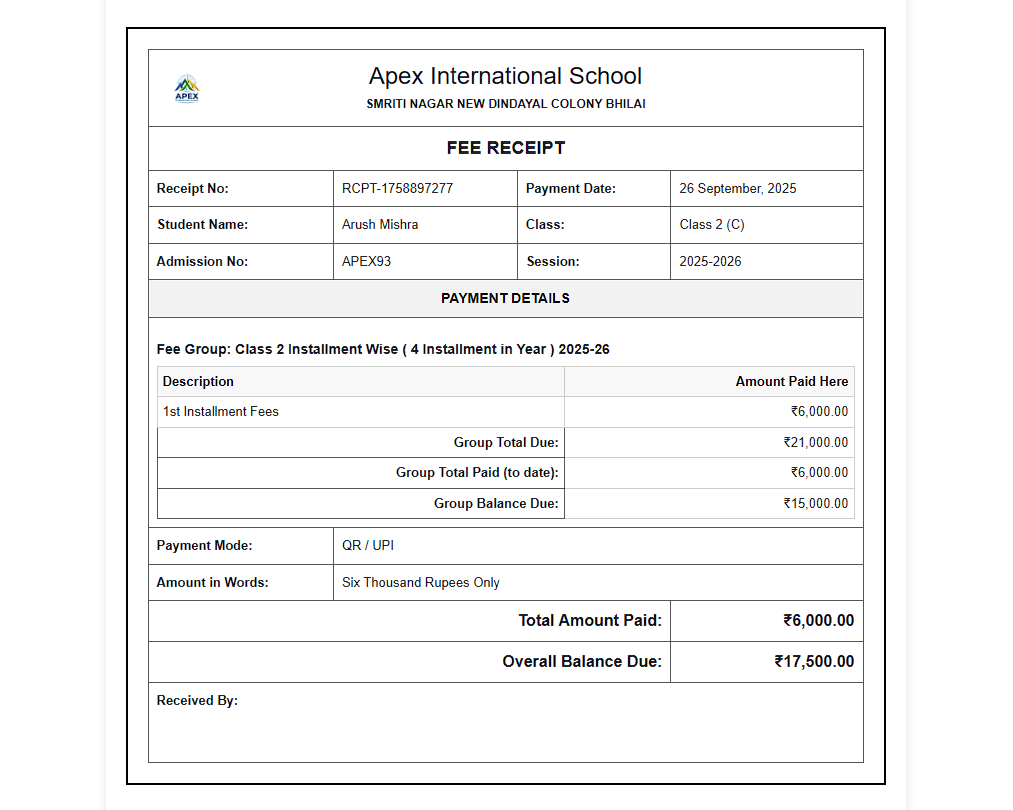
- Click Save. The payment is recorded, and the system automatically generates a printable receipt.
Applying Discounts
- After finding a student on the "Collect Fees" page, click the Apply Discount button on an unpaid invoice.
- In the modal:
- Select Discount: Choose a predefined discount from the dropdown.
- The discount amount will be calculated automatically.
- You must provide a reason or note for applying the discount.
- Click Save. The student's due amount for that invoice will be reduced.
3.4 Tracking and Reporting
These sections provide an overview of the financial health of the school.
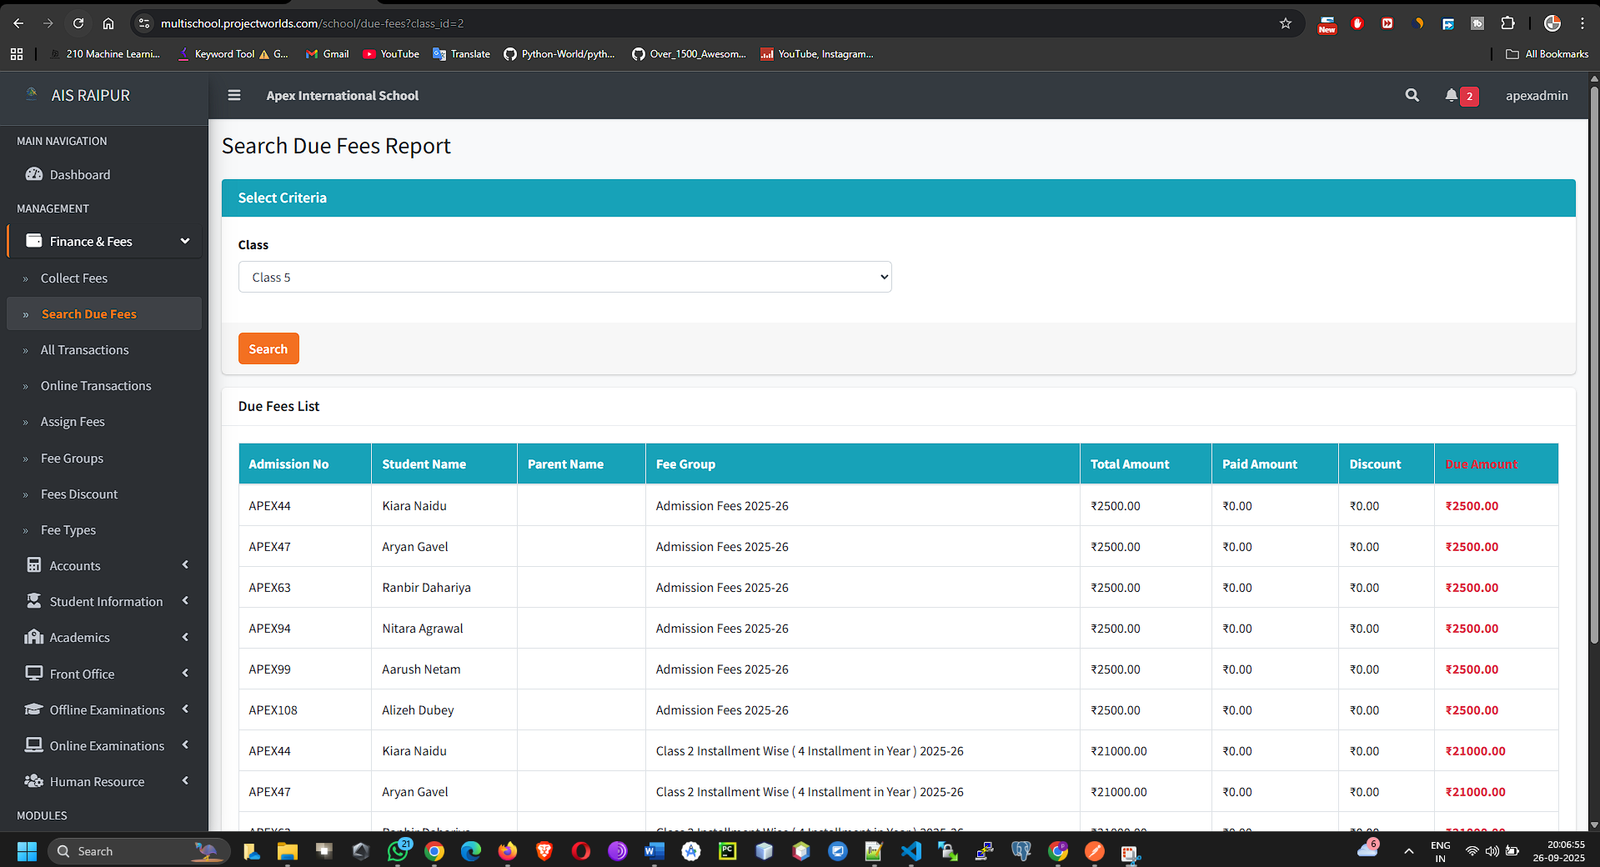
Search Due Fees
Navigation: MANAGEMENT > Finance & Fees > Fees Management > Search Due Fees
- This powerful search tool helps you find students with outstanding payments.
- You can filter by Class, Section, or a specific Fee Group.
- The results will show a list of all students who have a balance amount, making it easy to generate a defaulters list.
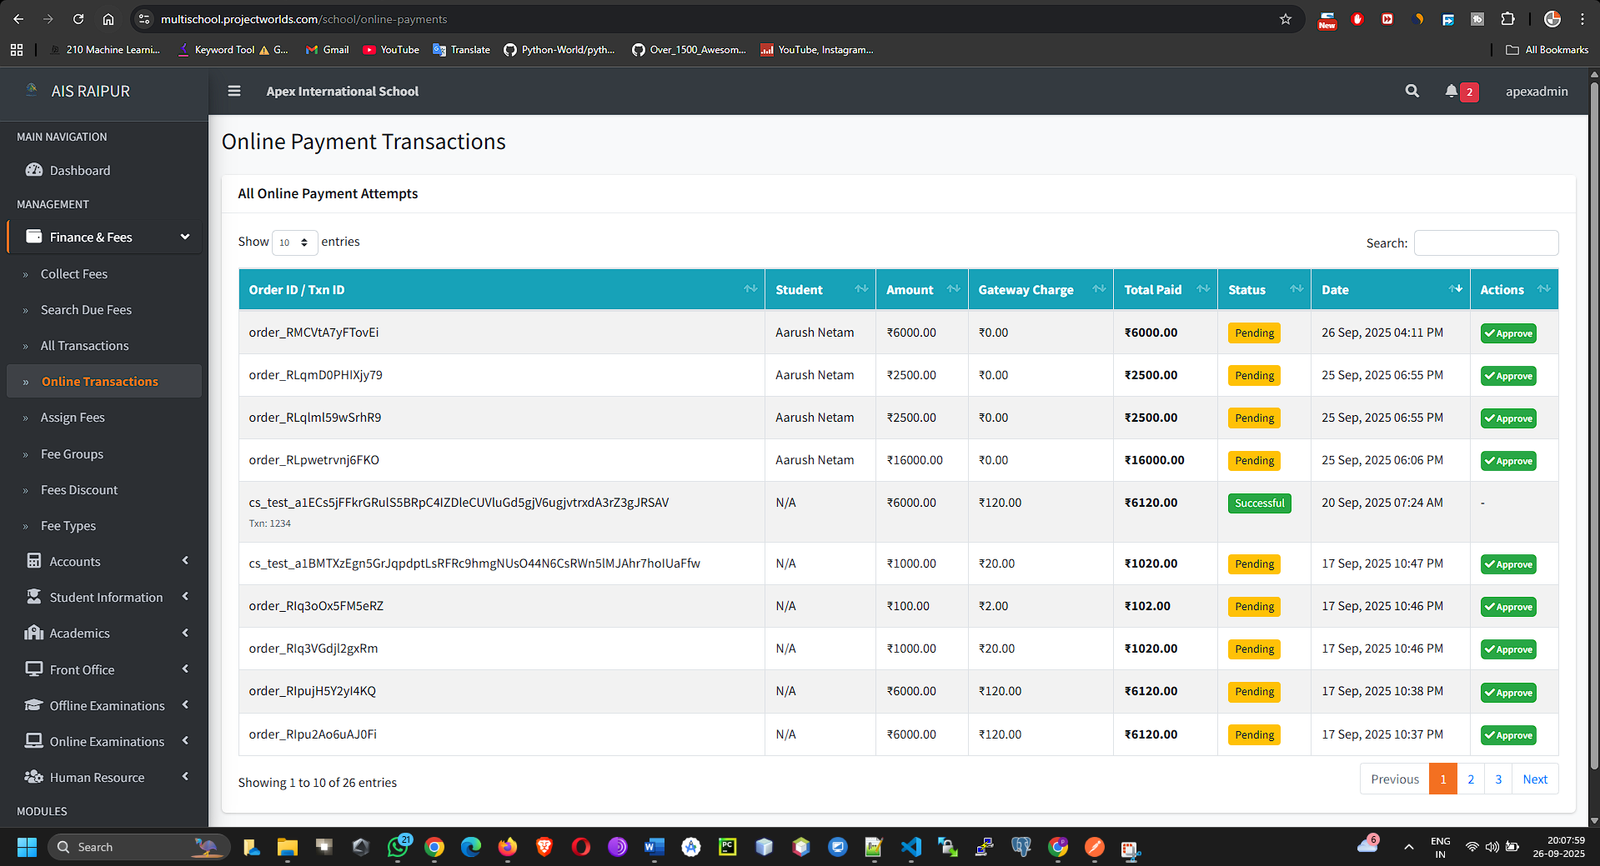
Online Transactions
Navigation: MANAGEMENT > Finance & Fees > Fees Management > Online Transactions
- This page lists all fee payment attempts made by parents through the online payment gateway (e.g., Razorpay, Stripe) via the parent app or portal.
- You can see the Order ID, Transaction ID, Amount, and Status (pending, successful, failed).
- This is a critical page for reconciling online payments.
3.5 Accounts: Income & Expense
Beyond student fees, this submodule lets you track all other school income and expenses.
Navigation: MANAGEMENT > Finance & Fees > Accounts
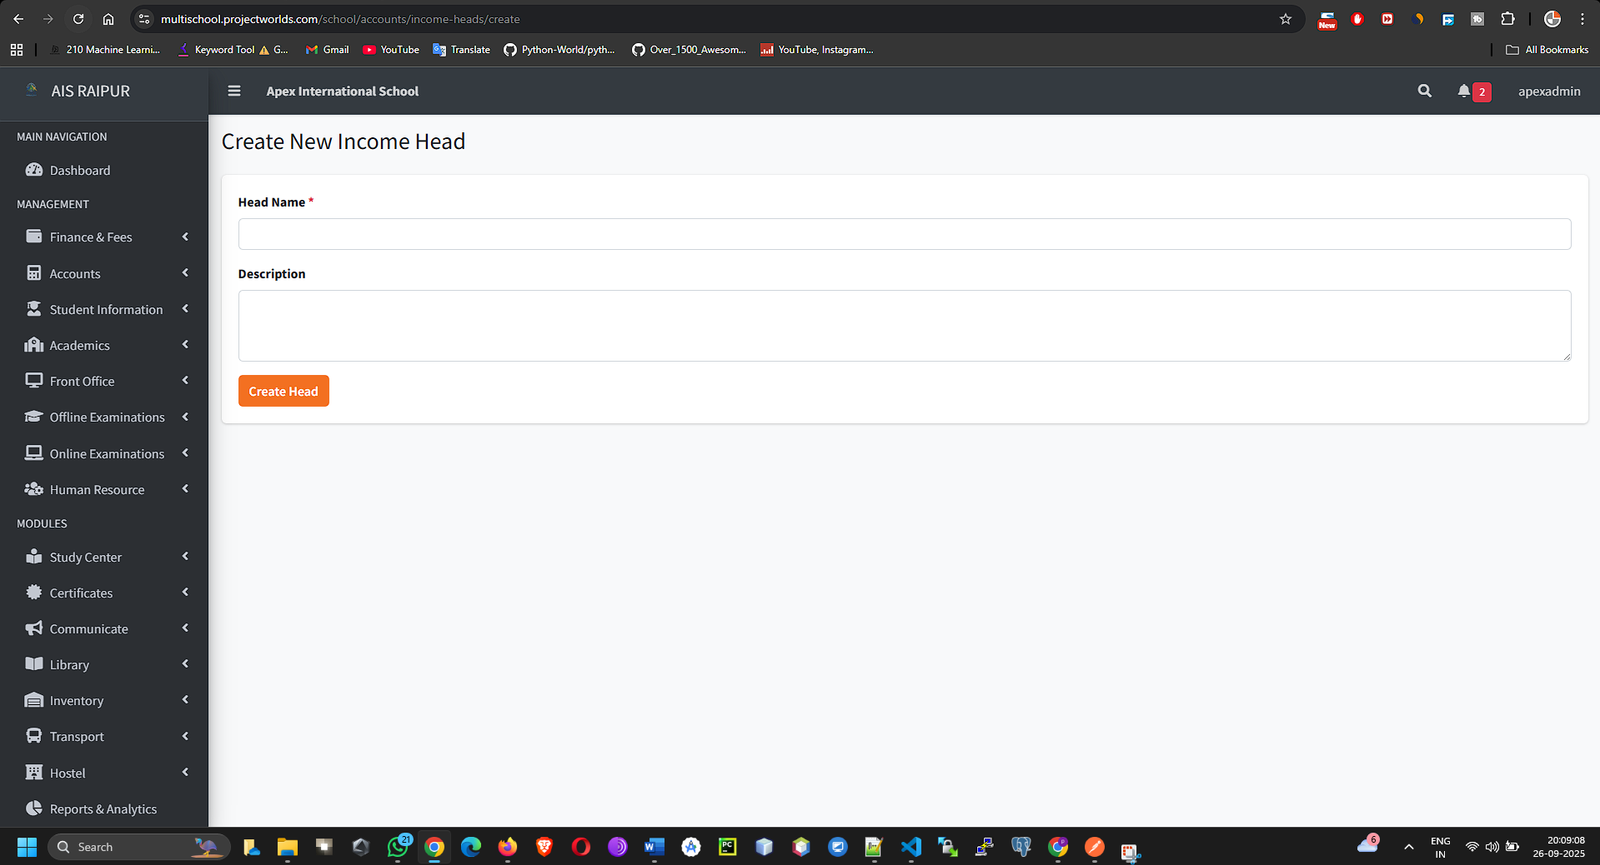
Step A: Create Income/Expense Heads
Before recording transactions, you must categorize them.
- Go to Accounts > Income Heads or Accounts > Expense Heads.
- Click Add New Head.
- Enter the name of the category.
- Income Head Examples: "Donations", "Scrap Sale", "Uniform Sale".
- Expense Head Examples: "Electricity Bill", "Staff Salary", "Stationery Purchase", "Maintenance".
Step B: Record Income/Expense
- Go to Accounts > Income or Accounts > Expense.
- Click Add New Income or Add New Expense.
- Fill in the form:
- Select Head: Choose the category you just created.
- Name: A specific name for this transaction (e.g., "Payment for August Electricity Bill").
- Date: The date of the transaction.
- Amount: The transaction amount.
- Attachment (Optional): You can upload a scanned copy of the receipt or invoice.
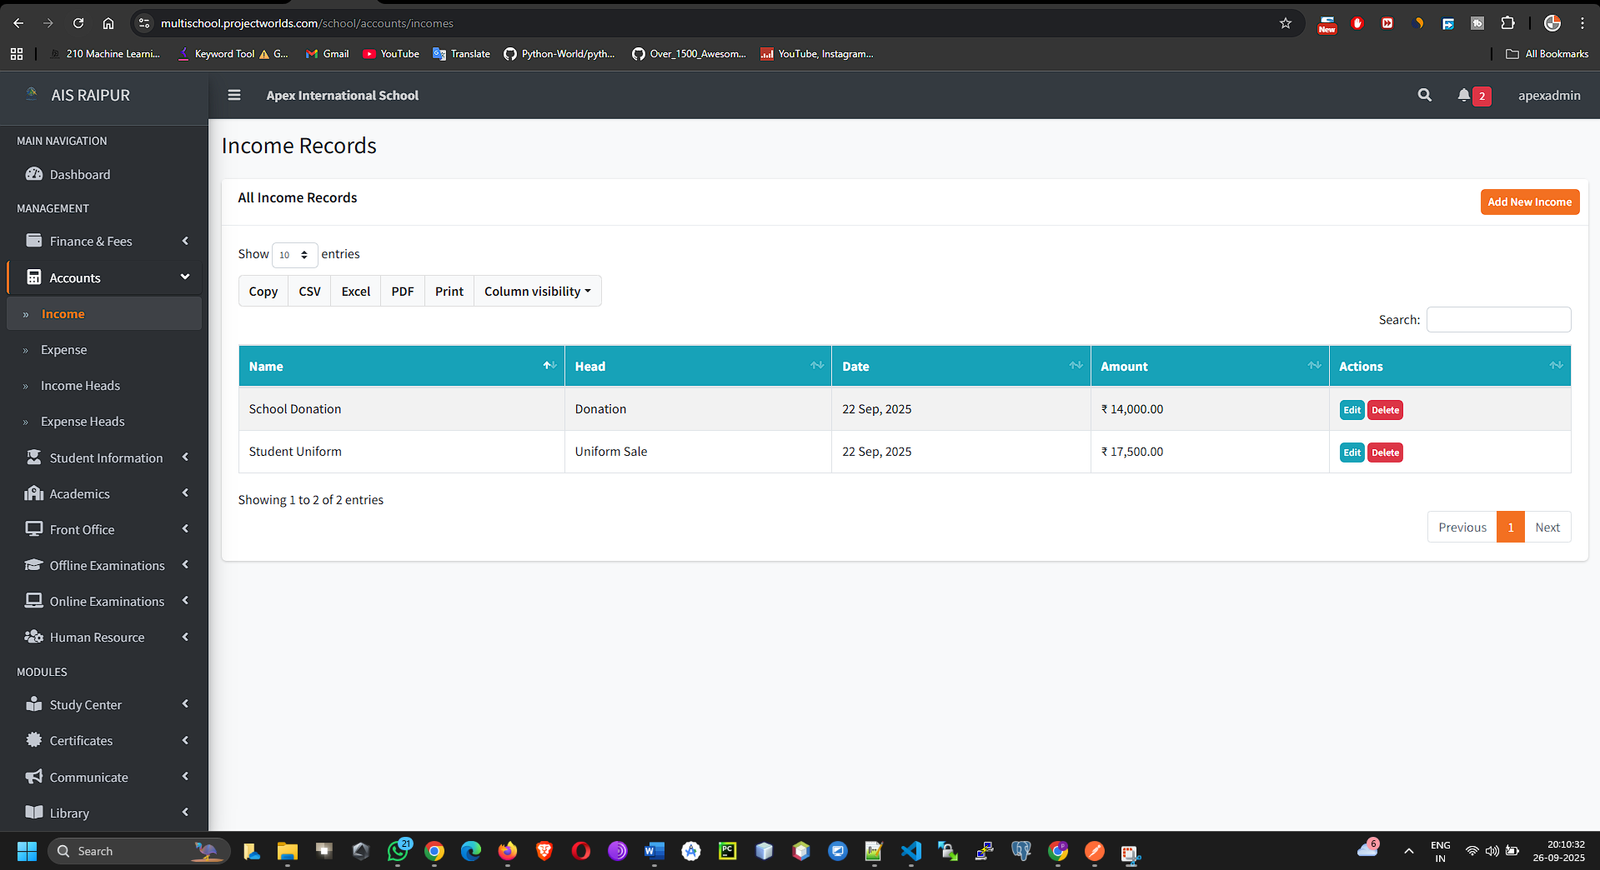
- Click Save. These records are vital for financial reporting.