To create and manage the entire lifecycle of traditional written exams, from scheduling and setting marks to entering student scores and generating final, printable report cards.
5.1 Exam Setup: The Ground Rules
Before you can create an exam, you must define the rules for evaluation and grading.
Navigation: MANAGEMENT > Offline Examinations > Exam Setup
Step A: Create Exam Types
Exam types define the nature of an assessment component.
- From the Exam Setup menu, select Exam Types.
- Click the + Add New Exam Type button.
- Fill in the details:
- Exam Type Name: The name of the assessment. Examples: "Theory", "Practical", "Oral Assessment", "Internal Assessment".
- Abbreviation (Optional): A short code. Example: "TH", "PR".
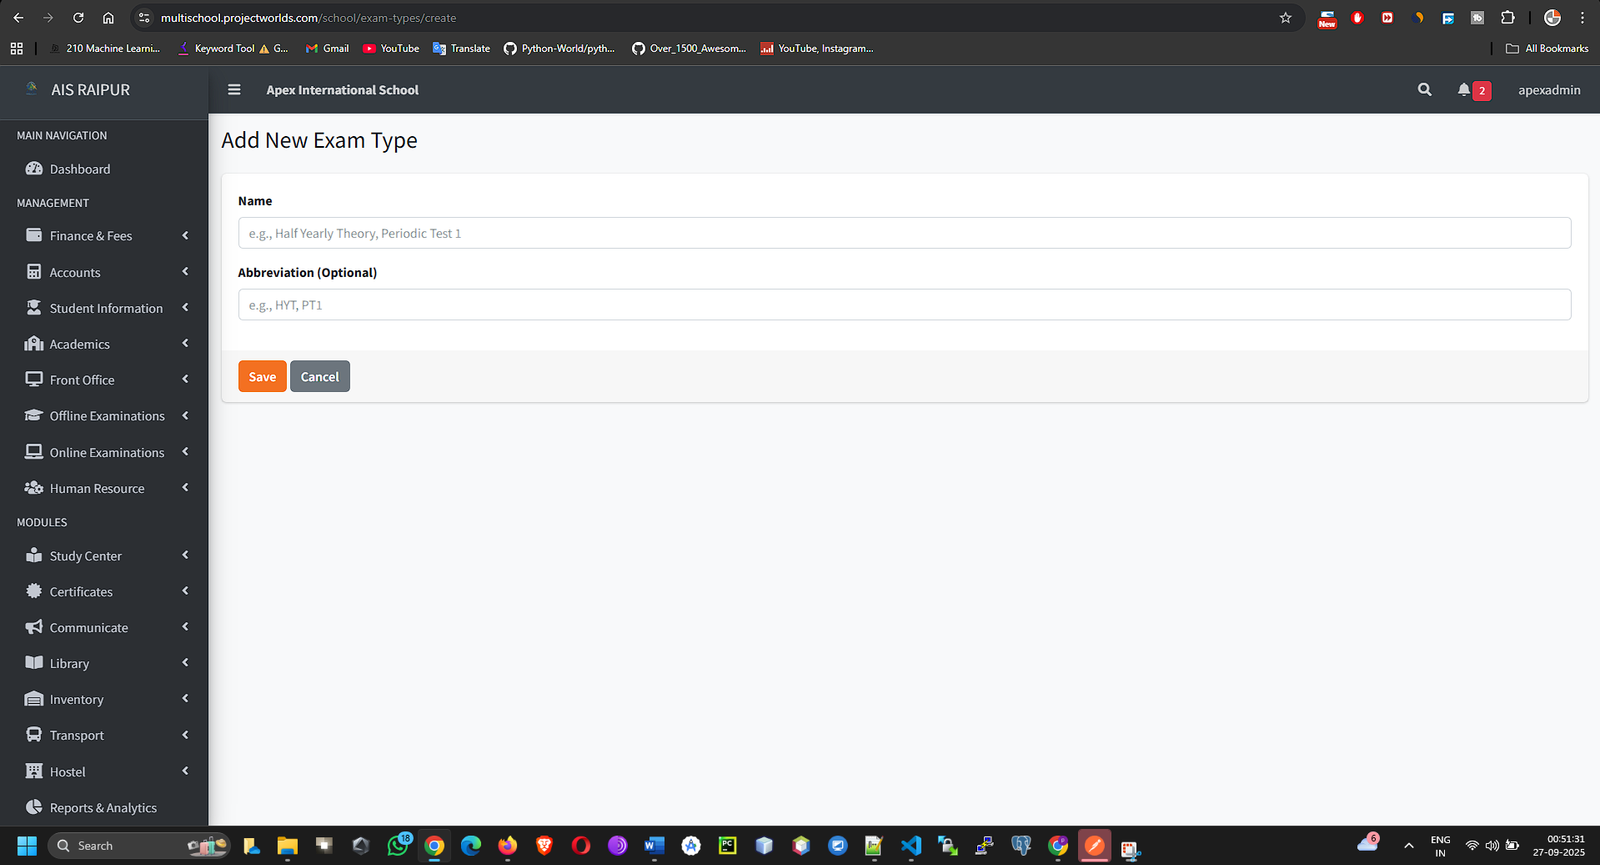
- Click Save.
Step B: Manage Grades
Grades define the performance levels based on percentage scores.
- From the Exam Setup menu, select Manage Grades.
- Click the + Add New Grade button.
- Define the grading scale:
- Grade Name: The letter grade. Example: "A1", "A+", "B".
- Min Percentage: The minimum percentage required to achieve this grade.
- Max Percentage: The maximum percentage for this grade.
- Description (Optional): Any remarks, like "Excellent" or "Good".
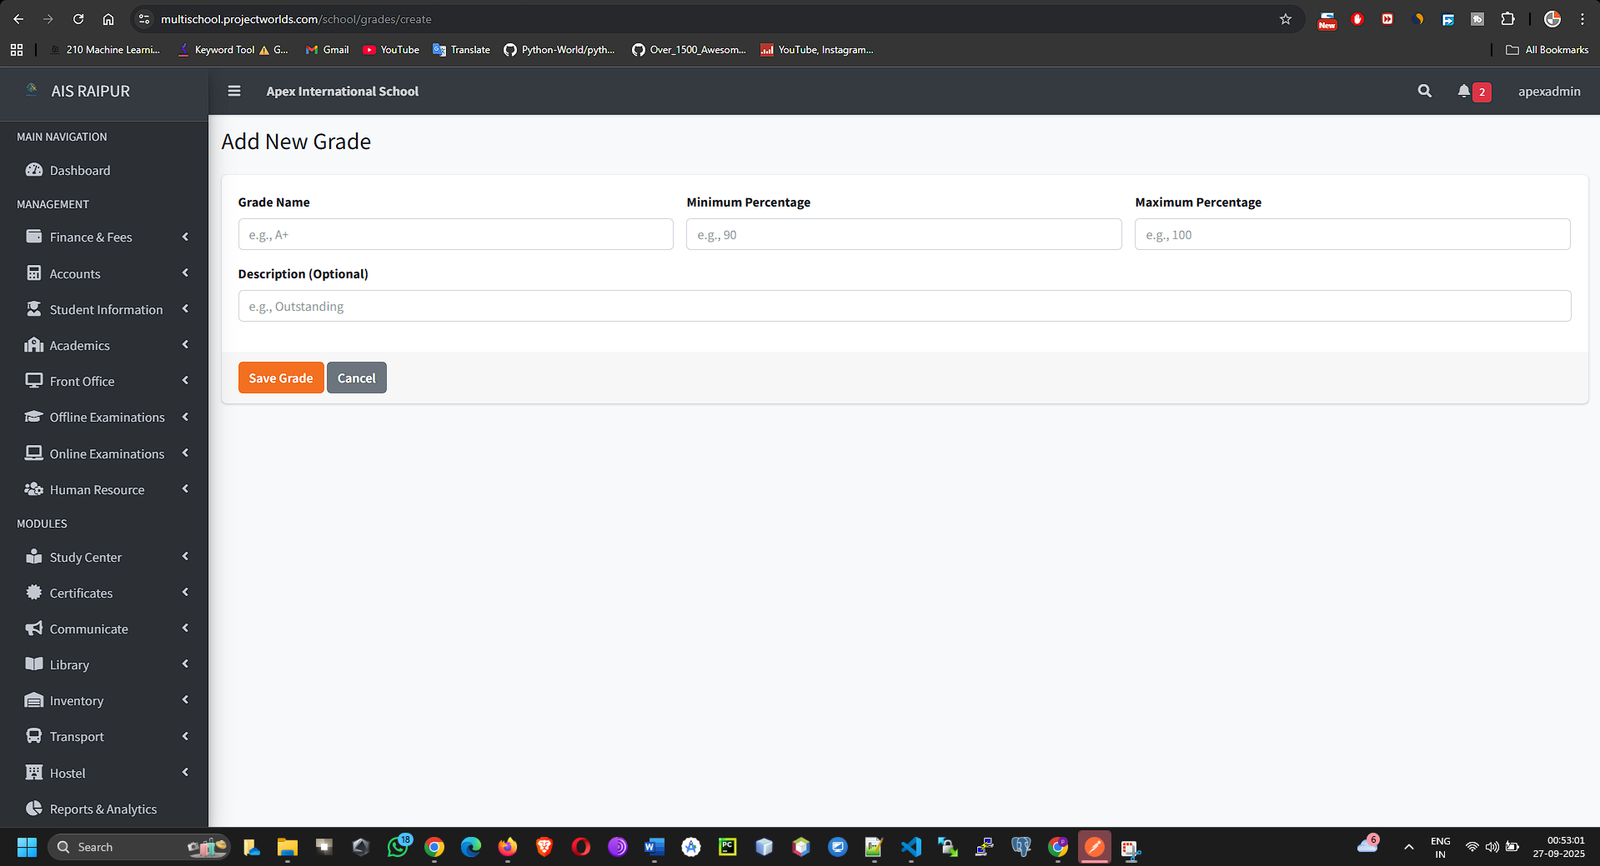
- Click Save. Create a complete grading scale from the highest grade to the lowest.
Step C: (Optional) Cocurricular Areas
If your report cards include grades for non-academic activities, define them here.
- From the Exam Setup menu, select Cocurricular Areas.
- Click + Add New Area.
- Enter the Area Name. Examples: "Discipline", "Art & Craft", "Sportsmanship", "Musical Skills".
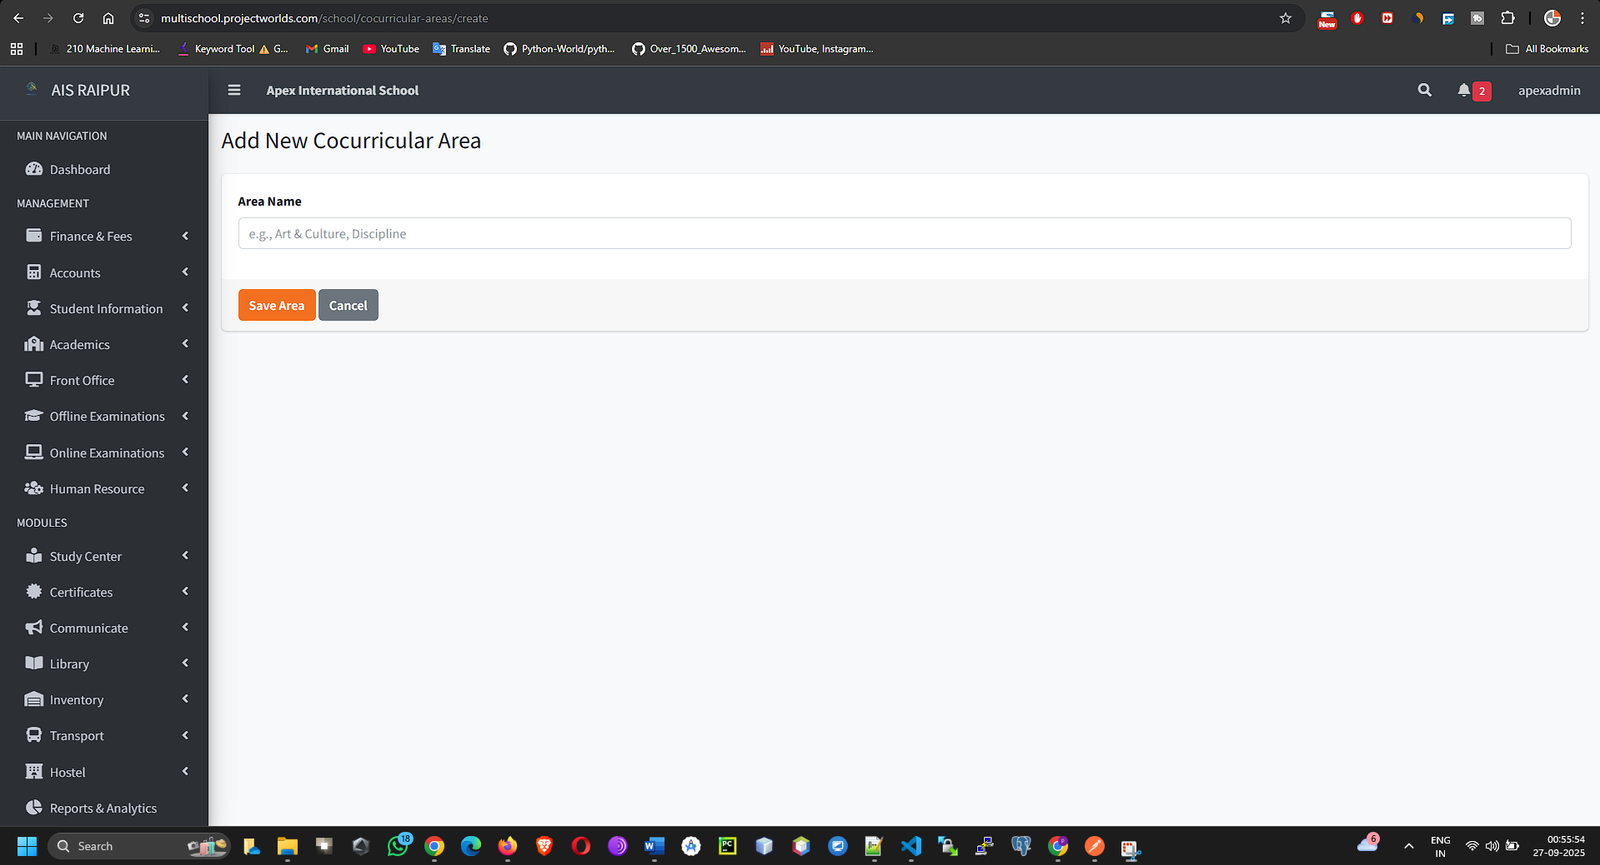
- Click Save.
5.2 Creating an Examination
Here you will define a major examination event, like a terminal or final exam.
Navigation: MANAGEMENT > Offline Examinations > Manage Offline Exams
- Click the + Add New Exam button.
- Fill in the form:
- Exam Name: A clear and descriptive name. Examples: "Mid-Term Examination 2025", "Final Examination 2025-26", "Unit Test 1".
- Academic Session: The session is usually locked to the current one.
- Start Date & End Date: The overall date range during which the entire examination will be conducted.
- Description: Any general notes about the exam.
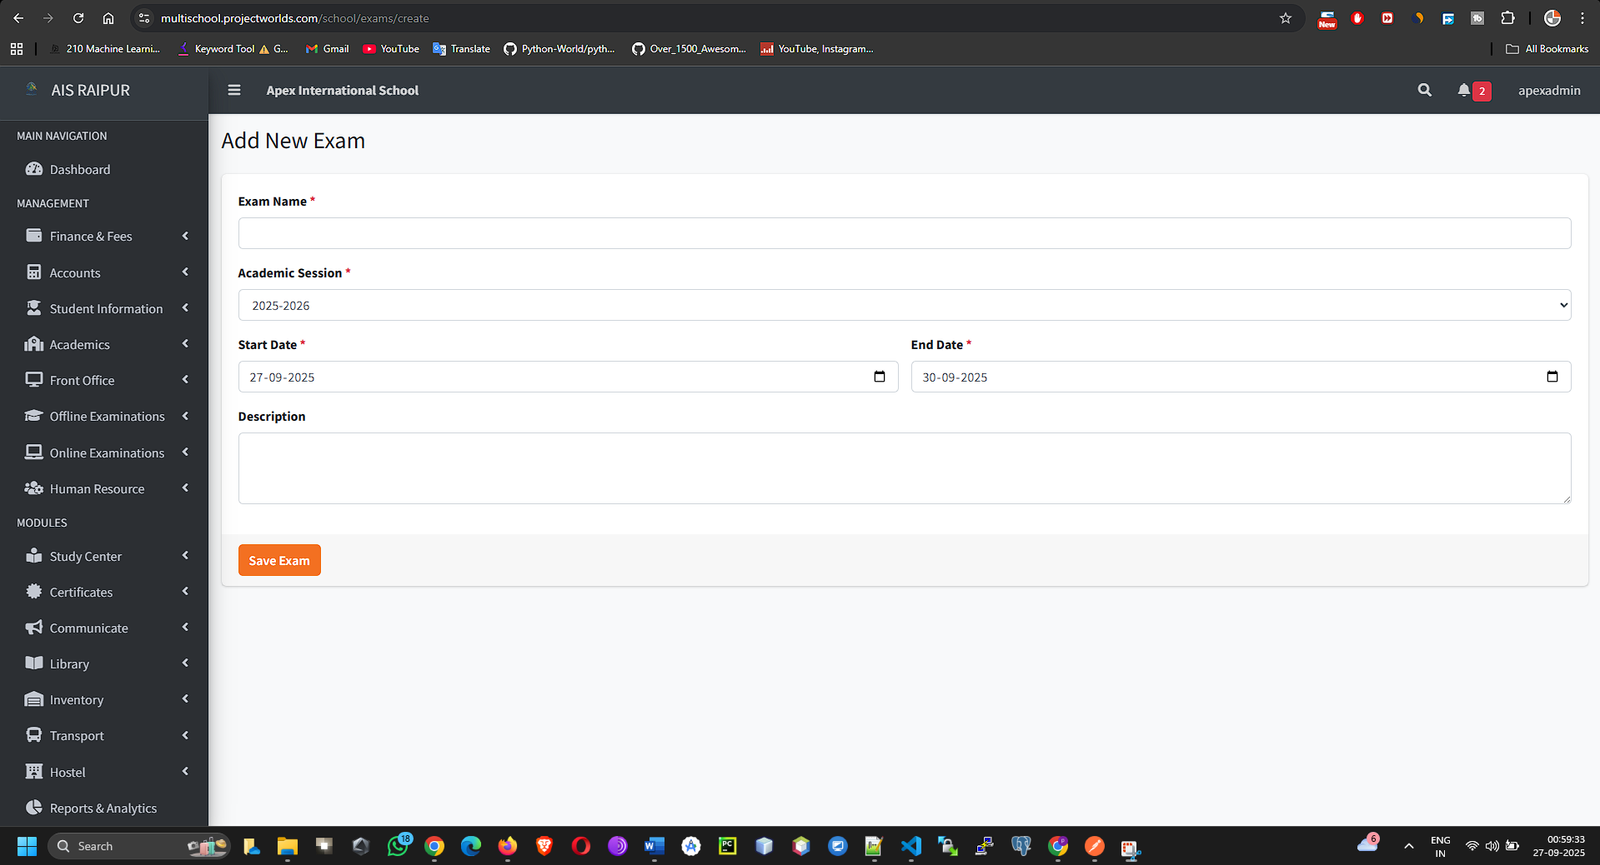
- Click Save. The exam is now created, but it is empty. The next step is to schedule subjects within it.
5.3 Schedule & Marks Setup
This is the most critical step. Here, you will schedule individual subject exams and define the marking scheme.
Navigation: MANAGEMENT > Offline Examinations > Schedule & Marks Setup
- On this page, first Select Exam (e.g., "Mid-Term Examination 2025") and then Select Class.
- The page will split into two main sections: Exam Schedule (Optional) and Marks Distribution.
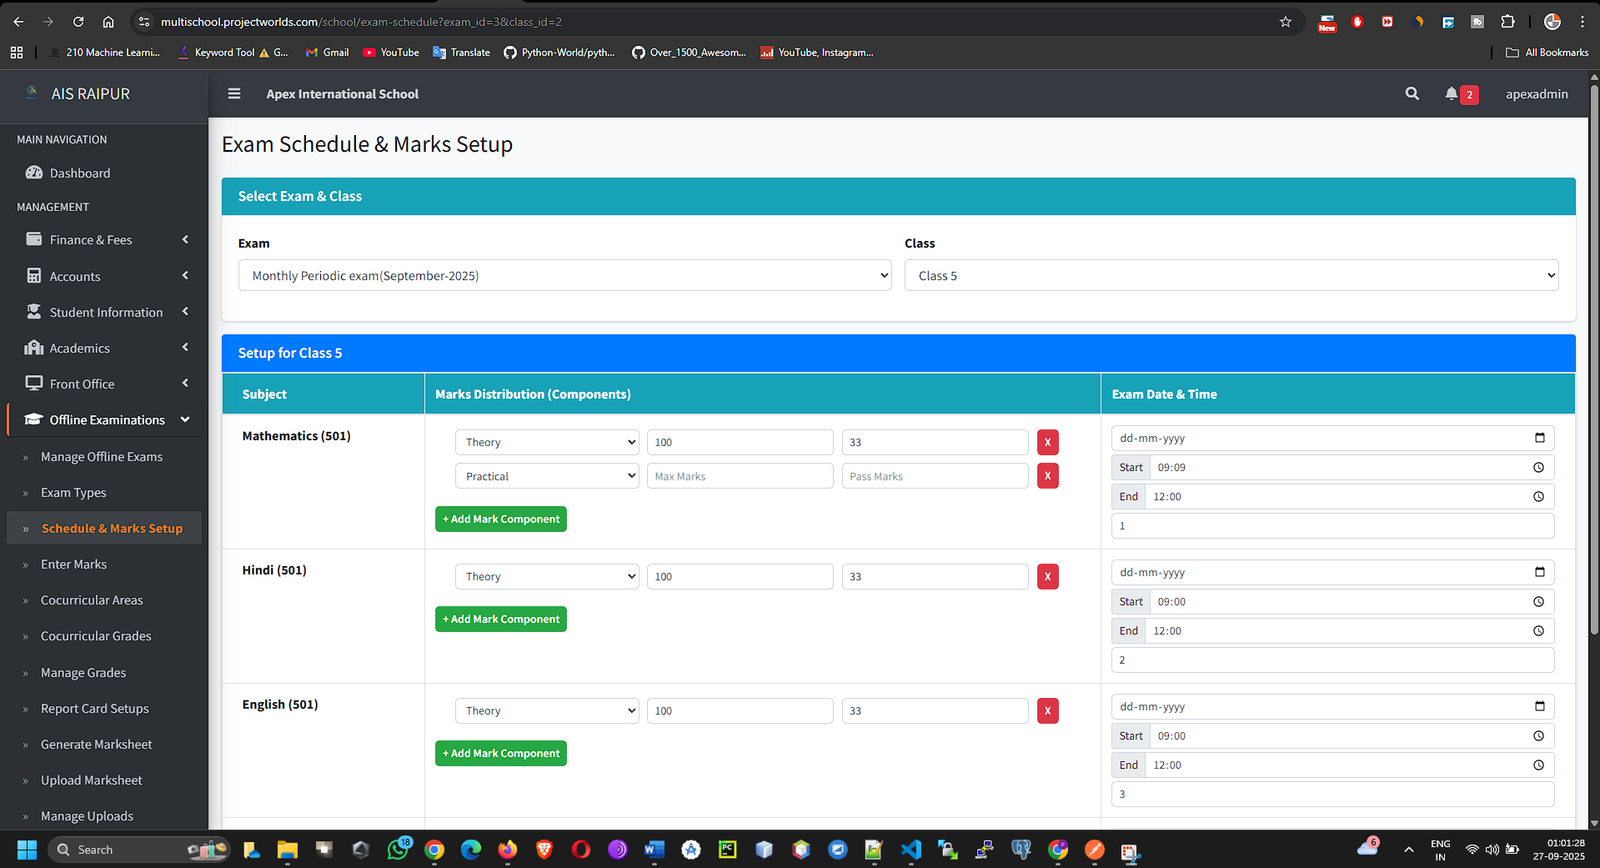
Part A: Exam Schedule (Creating the Timetable)
- In the "Exam Schedule" section, you will see a list of subjects assigned to the selected class.
- For each subject, fill in the details:
- Exam Date: The specific date for this subject's exam.
- Start Time & End Time: The timings for the exam.
- Room Number (Optional): The room where the exam will be held.
Part B: Marks Distribution (Setting the Marking Scheme)
- In the "Marks Distribution" section below, click the + Add Row button.
- For each row, you will define one component of the evaluation for a subject:
- Select Subject: Choose a subject from the dropdown.
- Select Exam Type: Choose a type you created in Step 5.1 (e.g., "Theory").
- Max Marks: The maximum marks for this component.
- Passing Marks: The minimum marks required to pass this component.
- Example Scenario: For the "Science" subject, you might add two rows:
- Row 1: Subject: Science, Exam Type: Theory, Max Marks: 70, Passing Marks: 23.
- Row 2: Subject: Science, Exam Type: Practical, Max Marks: 30, Passing Marks: 10.
- After defining the schedule and marks distribution for all subjects, click the Save button.
5.4 Entering Student Marks
Once the exams are conducted and papers are graded, you can enter the scores into the system.
Navigation: MANAGEMENT > Offline Examinations > Enter Marks
- Select the Exam, Class, Section, and Subject.
- Click Search.
- A list of all students in that section will appear. The page will show columns for each "Exam Type" you defined for that subject (e.g., a column for "Theory" marks and a column for "Practical" marks).
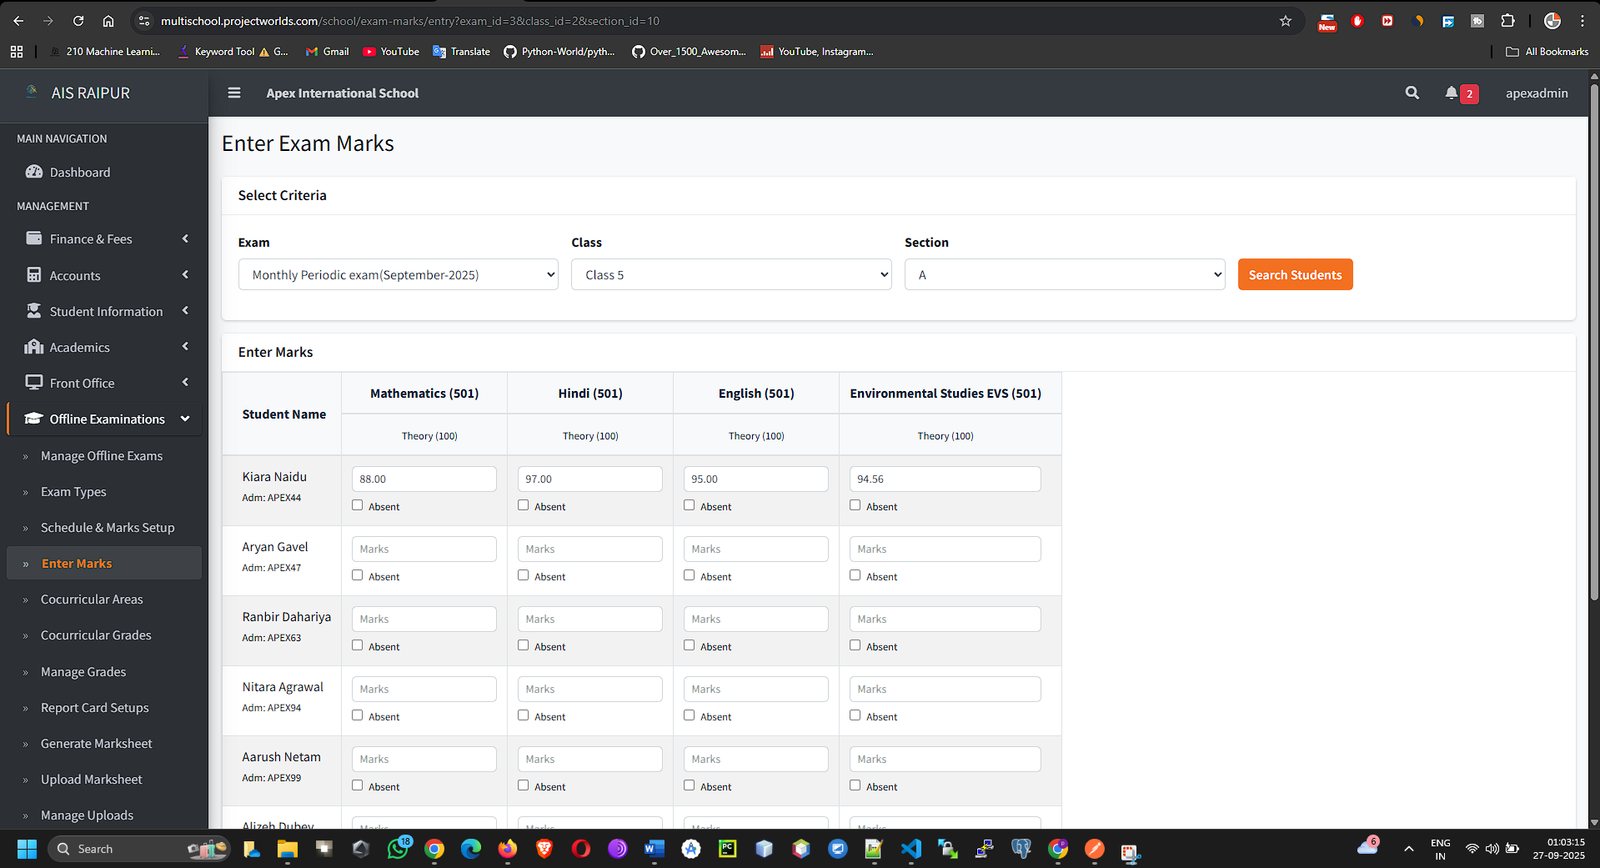
- Enter the Marks Obtained for each student in the appropriate columns.
- You can also mark a student's Attendance Status as Absent if they did not take the exam.
- Click Save Marks. Repeat this process for every subject.
5.5 Generating Marksheets (Report Cards)
After all marks are entered, you can design and generate the final report cards.
Navigation: MANAGEMENT > Offline Examinations > Marksheet Generation
Step A: Report Card Setups (One-time Design)
- From the Marksheet Generation menu, select Report Card Setups.
- Click + Add New Setup.
- On the setup page:
- Setup Name: A name for this report card design (e.g., "Final Term Report Card Design").
- Select Template: Choose a base design template for the report card.
- Exams to Include: This is the key part. Check the boxes for all the exams whose results you want to display on this report card (e.g., "Mid-Term Examination 2025", "Final Examination 2025-26"). You can also assign a Weightage if the final score is an average of multiple exams.
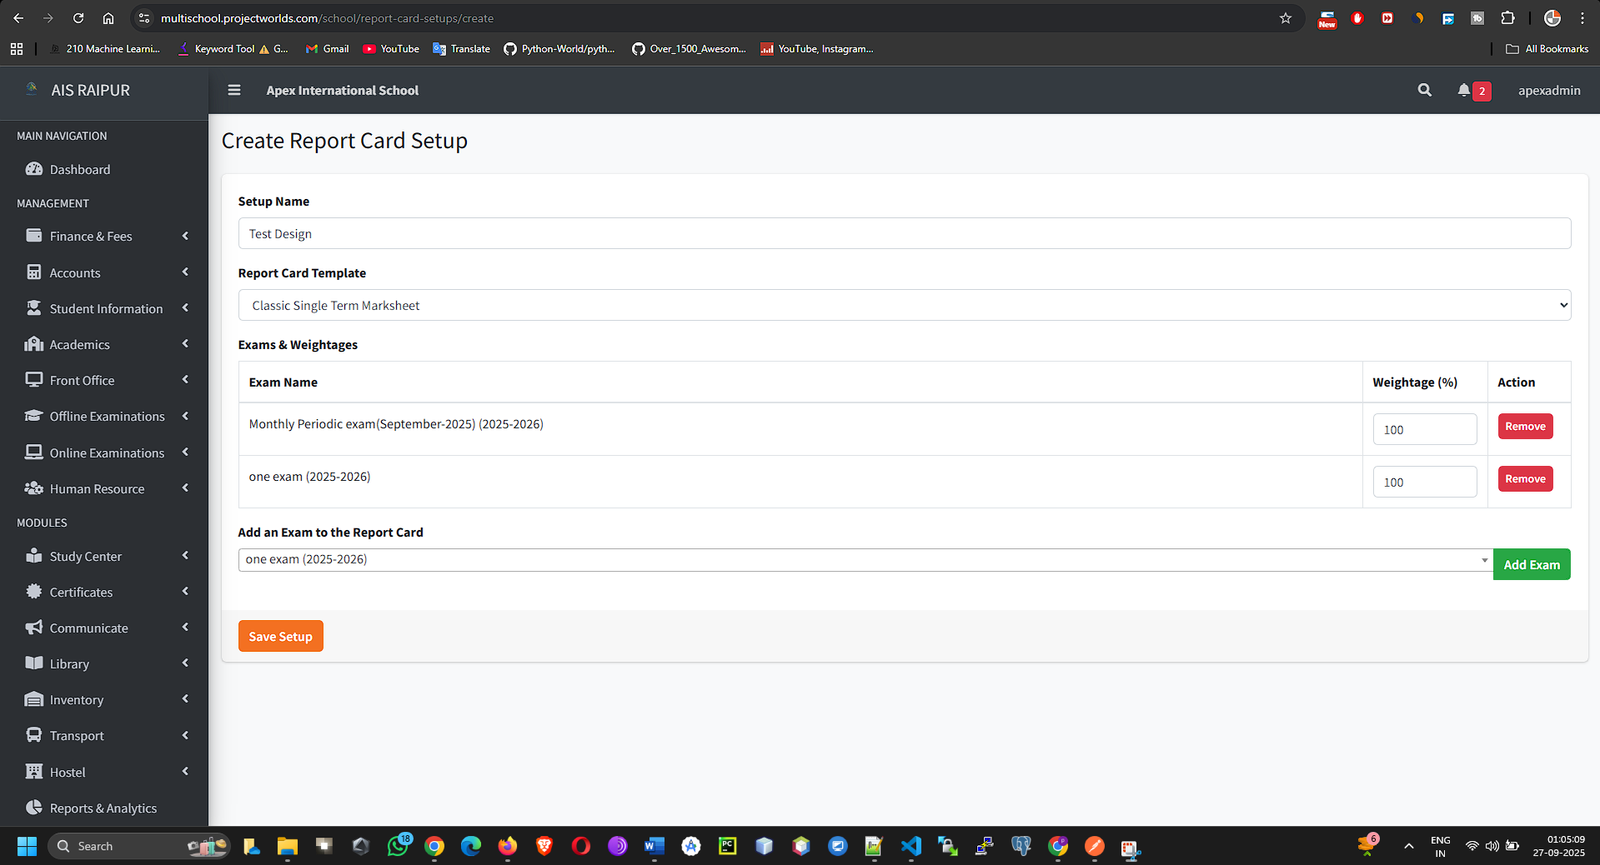
- Click Save.
Step B: Generate Marksheet
- From the Marksheet Generation menu, select Generate Marksheet.
- Select the Report Card Setup you just created, then select the Class and Section.
- Click Generate.
- The system will compile all the data and generate a preview of the report cards for all students in the section.
- You can then choose to Print or Download the report cards individually or as a batch.


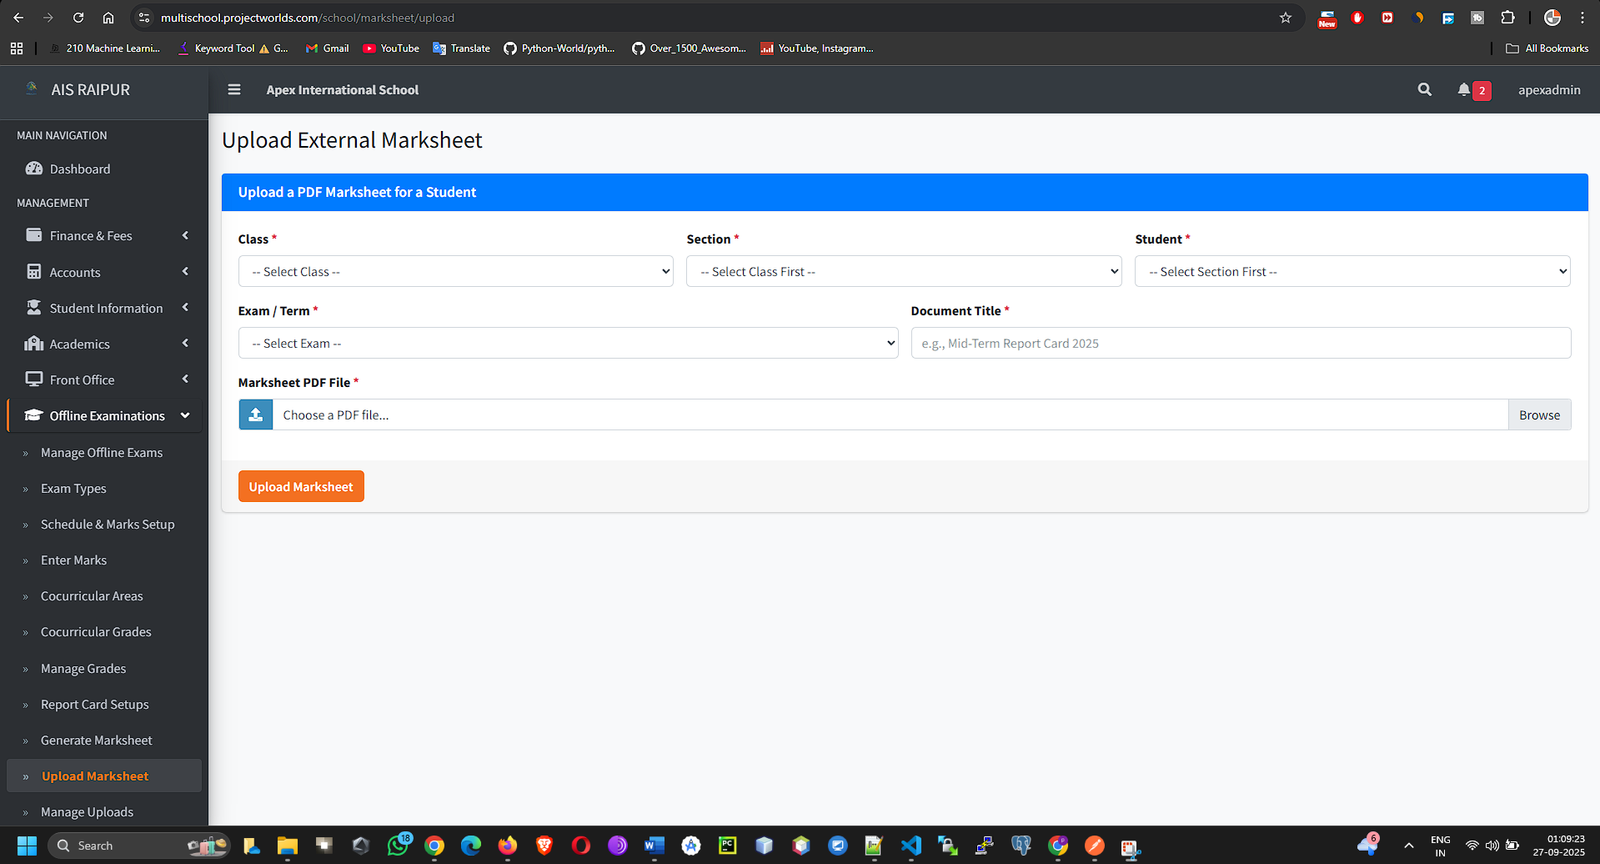
5.6 Uploaded Marksheets
This feature is for situations where you might use an external system to generate marksheet PDFs and want to make them available to students in their portal.
Navigation: MANAGEMENT > Offline Examinations > Marksheet Generation > Uploaded Marksheets
- Upload Marksheet: Select a student, exam, and upload their pre-made PDF marksheet.
- Manage Uploads: View a list of all uploaded marksheets and choose to Publish or Unpublish them, which controls their visibility in the student/parent app.