To manage the school's transportation services, including defining vehicle details, creating bus routes with designated stops, assigning students to routes, and enabling live vehicle tracking.
10.1 Transport Setup: Vehicles & Routes
First, you must set up the core components of your transport system.
Navigation: MODULES > Transport
Step A: Manage Vehicles
This is where you register every vehicle in the school's fleet.
- From the Transport menu, select Manage Vehicles.
- Click the + Add New Vehicle button.
- Fill in the vehicle's details:
- Vehicle Number: The official registration number of the vehicle (e.g., "CG-07-AB-1234").
- Model: The make and model of the vehicle (e.g., "Tata Winger").
- Capacity: The maximum number of students it can hold.
- Driver Name & Phone: The contact details of the assigned driver.
- Enable Live Tracking: Check this box if the vehicle is equipped with a GPS device.
- GPS Device IMEI: If tracking is enabled, enter the unique 15-digit IMEI number of the GPS device installed in the vehicle. This is critical for the tracking feature to work.
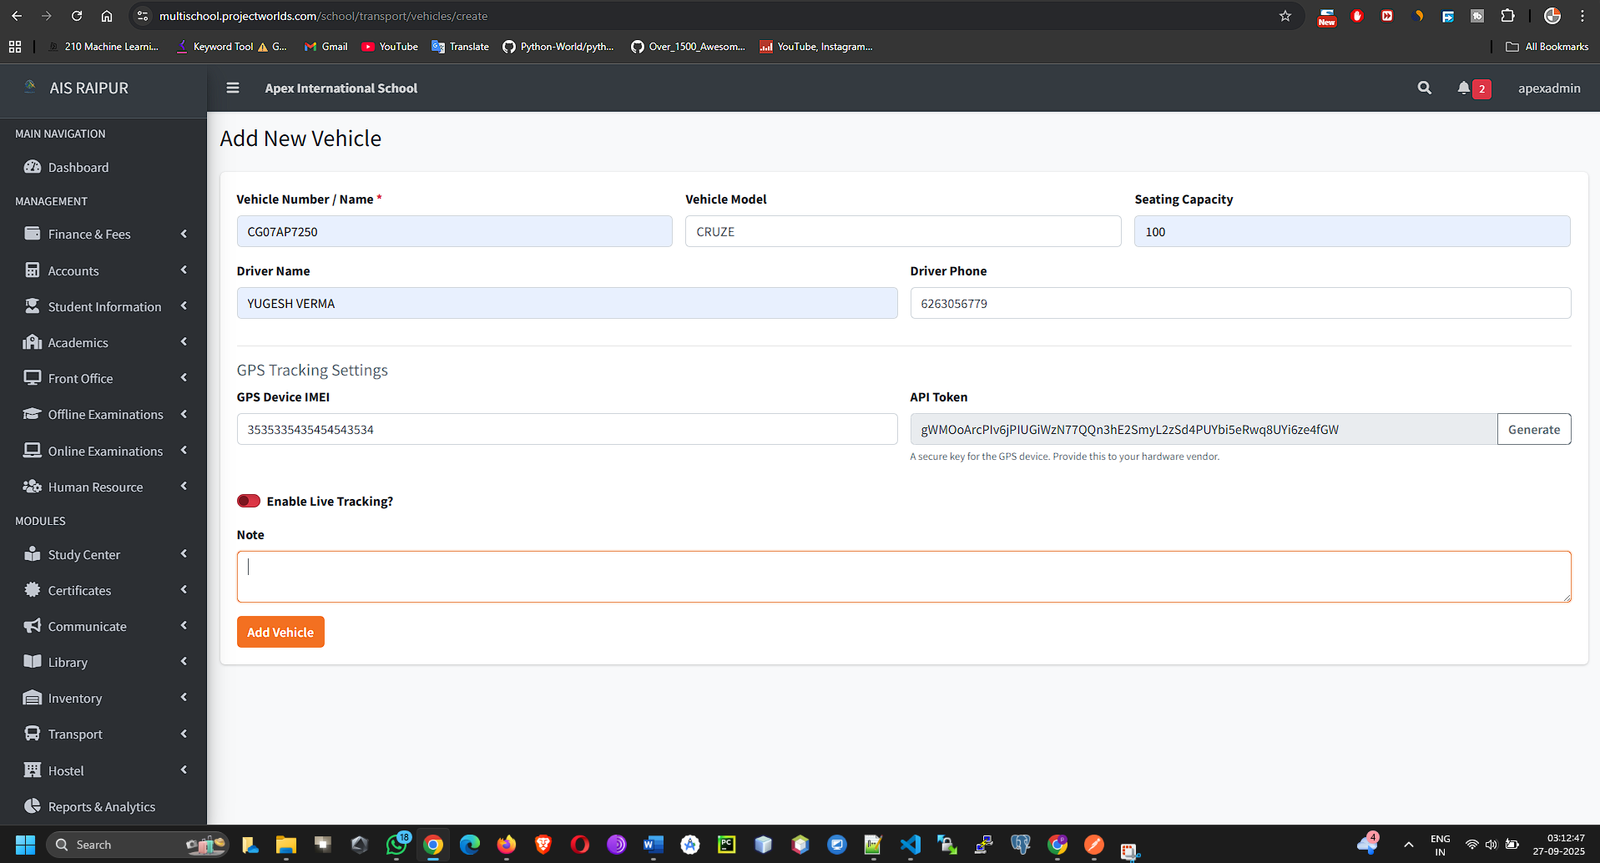
- Click Save. Add all vehicles in your fleet to this list.
Step B: Manage Routes
A route is a specific path a vehicle takes, which includes multiple stops.
- From the Transport menu, select Manage Routes.
- Click the + Add New Route button.
- On the "Add Route" page, provide the basic route information:
- Route Name: A descriptive name for the route. Example: "Nehru Nagar Route", "Route 3B".
- Assign Vehicle: Select a vehicle from the dropdown that will service this route.
- Fare: Enter the fee that will be charged to students who use this route.
- Add Stops to the Route:
- In the "Stops" section on the same page, click + Add Stop.
- A modal will appear. Enter the Stop Name. Example: "Smriti Nagar Gate", "Civic Center Bus Stop".
- (Note: Latitude/Longitude fields may be present for precise map plotting; these can be filled if known).
- You can set a Stop Order to define the sequence of stops.
[SCREENSHOT: Transport_AddNewStop_Modal.png]
- Continue adding all the stops along this specific route.
- Once the route details and all its stops are defined, click Save Route.
10.2 Student Allocation to Routes
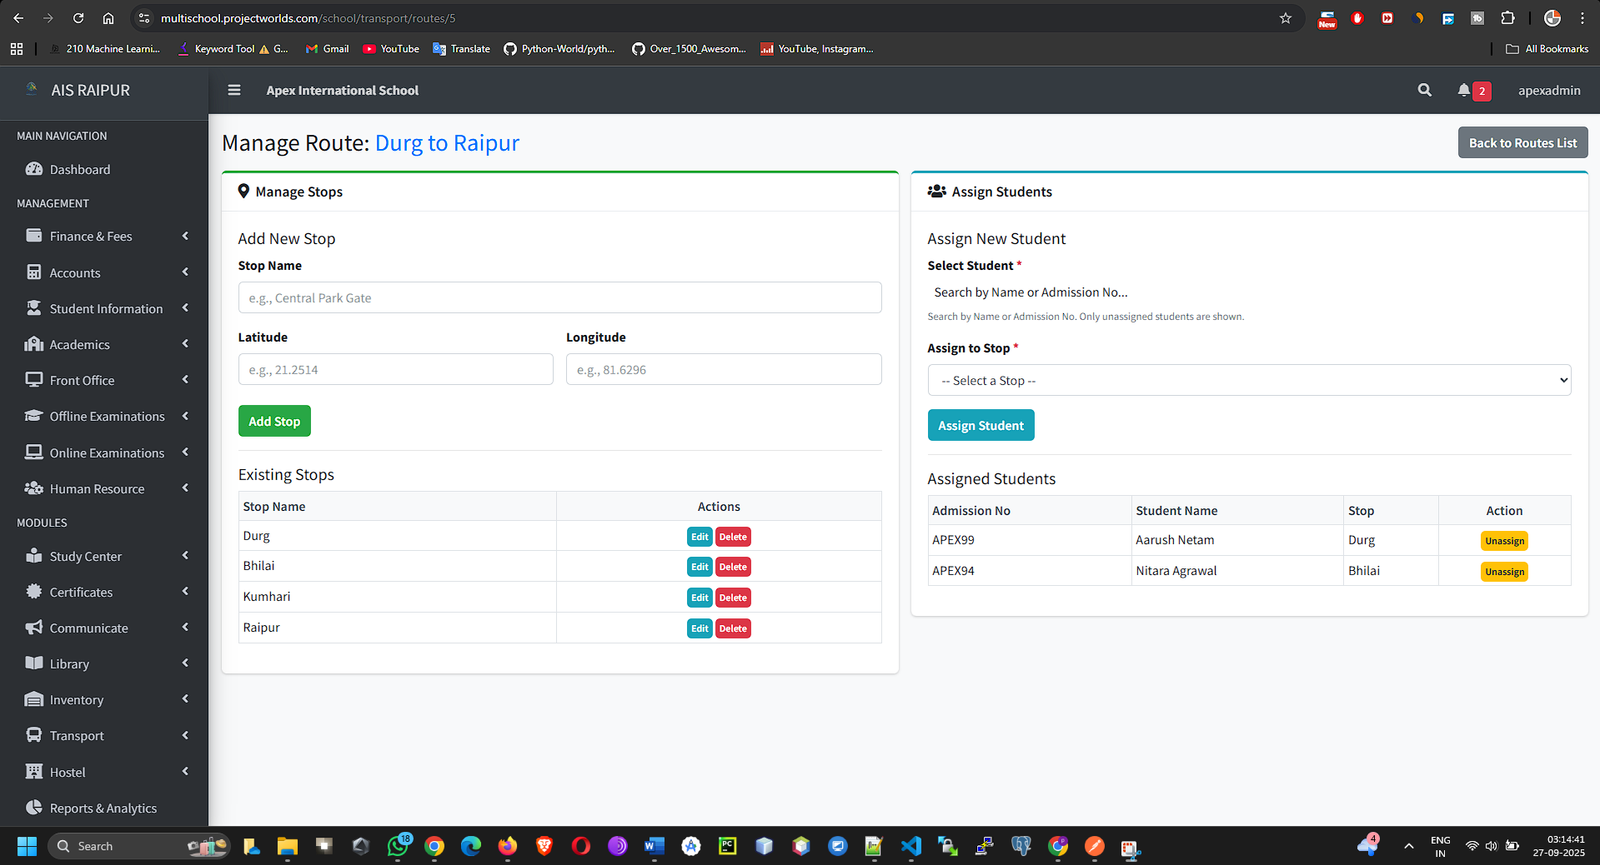
After defining routes, you must assign students to them. This is done on a route-by-route basis.
Navigation: MODULES > Transport > Manage Routes
- On the list of routes, find the route to which you want to add students.
- In the Action column, click the View/Manage (Eye) icon.
- This will take you to the Route Details Page. This page shows the route information, the list of stops, and a section for Student Allocation.
- In the "Student Allocation" section, click the + Assign Student button.
- An "Assign Student" modal will appear:
- Search Student: Start typing a student's name or admission number. Select the student from the search results.
- Select Stop: This dropdown will only show the stops that you have defined for this specific route. Choose the stop from where the student will board the bus.
- Click Save. The student is now officially assigned to the route and their designated stop. Their transport fee might be automatically generated based on this assignment.
- The "Student Allocation" list on the route details page will now show the newly added student. From here, you can also Unassign (Delete) a student from the route if they stop using the transport service.
10.3 Live Vehicle Tracking
If you have enabled tracking for a vehicle and correctly entered its GPS device IMEI, you can monitor its real-time location.
Navigation: MODULES > Transport > Live Vehicle Tracking
- This page will display a map.
- On the side or top of the map, there will be a list or dropdown of all your GPS-enabled vehicles.
- Select a vehicle from the list.
- The map will automatically center on the last known location of the vehicle and display its icon moving in real-time.
- The display may also show additional information like the vehicle's current speed and the last updated time.
![]()
How does it work?
- The GPS hardware installed in the bus sends its location data (latitude, longitude) to a specific URL in your ERP system (/api/track).
- Your ERP's GpsTrackingController receives this data and saves it to the vehicle_trackings table.
- The "Live Vehicle Tracking" page continuously fetches the latest coordinates for the selected vehicle from this table and updates its position on the map.
- This same location data is also made available to parents via the mobile app, so they can track their child's bus.